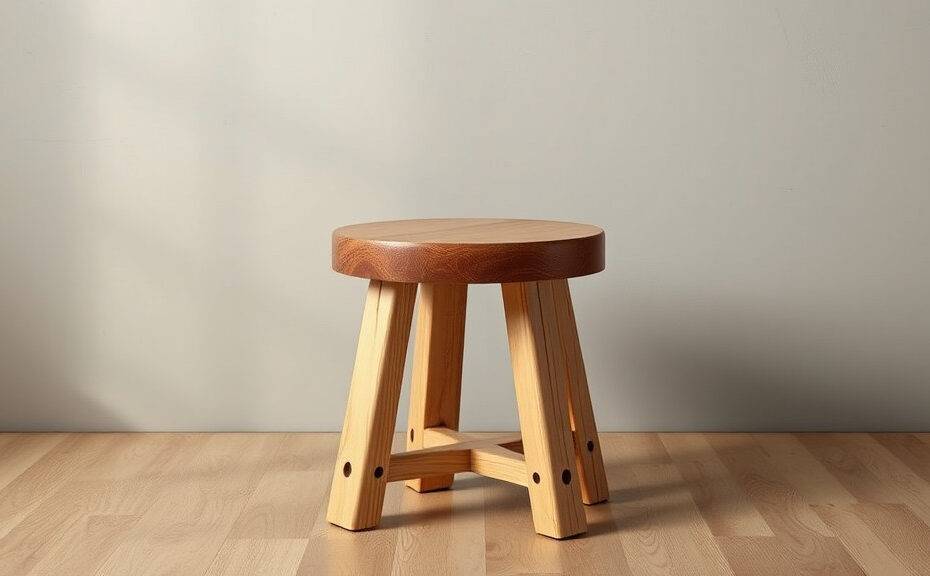
Step-by-Step Guide on How to Make a Simple Wooden Stool
Creating your own wooden stool is a satisfying woodworking project that requires minimal tools and materials. In this guide, you will learn a simple step-by-step process to make a sturdy and functional wooden stool. You don’t need to be a master carpenter; even beginners can follow these instructions with ease.
Materials You Will Need
- Wood (Choose a durable type like pine, oak, or birch)
- Saw (Hand saw or circular saw)
- Screwdriver
- Wood screws
- Wood glue
- Sandpaper (Medium and fine grit)
- Measuring tape
- Pencil
- Wood finish or paint (Optional)
Step 1: Planning Your Stool
Before you begin, decide on the dimensions of your stool. A common height for a stool is about 18 inches, making it comfortable for seating. The seat itself can be around 12 to 16 inches in width and length. You can sketch a design or simply note down your measurements to keep your project on track.
Step 2: Cutting the Wood
Once you have your measurements, take your wood and mark the cuts. You will need:
- 1 seat board: Cut a piece of wood to your desired dimensions (e.g., 16” x 16”)
- 4 legs: Cut four pieces of wood each about 18 inches long
- 4 stretchers: These connect the legs and add stability. Measure and cut four pieces to 12 inches in length.
Be careful when using the saw. Make straight cuts and take your time. Safety glasses are recommended!
Step 3: Prepping the Wood
Using sandpaper, smooth any rough edges and surface areas of your cut pieces. Start with medium-grit sandpaper to remove bigger rough spots, and then finish with fine-grit sandpaper for a smooth surface. This step is crucial if you want a nice finish and to avoid splinters.
Step 4: Assembling the Stool
Begin assembling the legs and stretchers first. Here’s how to do it:
- Attach the stretchers: Take two legs and attach a 12-inch stretcher between them about 6 inches from the bottom. Use wood glue and then drill screws in for stability. Repeat this for the other pair of legs.
- Connect the legs: Once both pairs of legs have stretchers, take them and form a rectangle by attaching the other two stretchers on the opposite sides. Ensure everything is square and level.
- Attach the seat: Now, take the seat board and place it centrally on top of the legs. Use screws to secure it from underneath into the legs. Adding wood glue can provide extra support.
Step 5: Finishing Touches
Once your stool is assembled, give it a final sand down to ensure there are no rough spots. If you wish, you can apply a wood finish or paint to your stool to enhance its appearance. This is also a great opportunity to match it with your home décor.
Step 6: Let It Dry
If you used wood glue, it’s important to let it dry fully according to the manufacturer’s instructions. This will ensure that your stool is sturdy and safe to use.
Step 7: Enjoy Your New Stool
Once everything is dry and secure, your simple wooden stool is complete! It’s ready for use in your home. You can place it in the living room, kitchen, or even outside on the patio. Feel free to showcase your handiwork or create a few more for a matching set.
This project is not only a practical addition to your home, but it also offers a sense of accomplishment. Enjoy crafting your stool and the beautiful results it brings to your space!
Essential Tools and Materials Needed for Wooden Stool Construction
If you’re planning to build a simple wooden stool, having the right tools and materials is essential for achieving great results. Whether you’re an experienced woodworker or a beginner, the following list covers all the basics you’ll need to get started on your woodworking project.
Tools Required for Wooden Stool Construction
Having the right tools makes the construction process easier and more efficient. Here’s a selection of necessary tools you should gather:
- Measuring Tape: Accurately measuring your wood pieces is crucial for a well-structured stool.
- Square: This tool helps ensure your angles are perfectly straight, which is important for stability.
- Saw: A hand saw or circular saw will be sufficient for cutting wood to size. You may also consider a miter saw for angled cuts.
- Drill: A power drill with various drill bits is necessary for making holes for screws or dowels.
- Screwdriver: A screwdriver will help you fasten the pieces together securely. Both flat-head and Phillips-head types are useful.
- Sandpaper: Use various grits to smooth out any rough edges on your wood pieces for a polished finish.
- Clamps: Clamps hold your pieces in place while you work, ensuring everything aligns correctly.
- Wood Glue: Strong adhesive is essential for joining pieces and adding extra durability.
Materials Needed
Next up are the materials that will make up the stool. Selecting high-quality wood and fasteners is important for both aesthetics and longevity. Here’s what you’ll need:
- Wood: Choose a sturdy wood like pine, oak, or birch. Aim for pieces that are free from knots and defects.
- Wood Screws: Select screws that are appropriate for the thickness of the wood you’ll be using. Generally, 1.5 to 2.5-inch screws are suitable for most stool constructions.
- Wood Finish: A finish, such as wood stain or paint, will enhance the beauty of your stool while providing protection against wear and tear.
- Wood Stain or Paint Brushes: These will be necessary for applying any finish you choose.
Optional Tools
While the above tools are essential, a few optional tools can make your life easier and improve the quality of your project:
- Jigsaw: Useful for making curved cuts if you want a decorative edge on your stool.
- Router: A router can add decorative edges and profiling to the stool’s finish.
- Wood Chisel: For cleaning up joints and creating precise cuts.
- Miter Box: Helps guide saw cuts for perfect angles.
Tips for Choosing Materials
When selecting your wood, keep these points in mind:
- Choose a type of wood that suits your intended use. For example, hardwoods are more durable and ideal for higher weight capacities.
- Check the grain pattern. Hand-selected boards not only look better but can also affect the sturdiness of your stool.
- Ensure the wood is seasoned and free from moisture. This helps prevent warping or cracking over time.
By gathering the proper tools and materials, you’ll set the foundation for a successful wooden stool project. Whether your goal is to create the perfect accent piece for your home or a functional addition, having the right equipment will make your experience much more pleasant and rewarding. From precise measurements to a smooth finish, everything you need is within reach, paving the way for your craftsmanship to shine.
Remember, each tool plays a significant role in ensuring that your stool isn’t just a project, but a piece of durable furniture that can be enjoyed for years. Happy woodworking!
Tips for Choosing the Right Wood for Your Stool Project
When embarking on a stool project, the choice of wood is vital to the overall outcome. Selecting the right type of wood can influence not just the aesthetic appeal but also the stool’s durability and functionality. Here are some key tips to help you make the best choice for your wooden stool project.
Consider the Purpose of the Stool
Before you choose the wood for your stool, think about its intended use. Will it be a decorative piece, or do you want it to withstand regular use? Understanding the function will guide your selection process.
Assess the Weight Capacity
Different types of wood have varying strengths. If the stool needs to support considerable weight, opt for sturdier woods such as oak, maple, or birch. These hardwoods offer greater load-bearing capabilities, while softer woods like pine may not be suitable for heavier use.
Evaluate Aesthetics
The look of the wood is just as important as its durability. Each type of wood brings its unique grain patterns and colors, affecting the final appearance of your stool. Here are some popular options:
- Oak: Known for its strength and beautiful grain.
- Maple: Offers a light tone with a smooth finish, ideal for modern designs.
- Pine: Affordable and easy to work with, great for rustic styles.
- Walnut: Dark, rich color that adds elegance to any project.
Consider Wood Stability
When creating furniture, you want to avoid wood that warps or splits easily. Look for woods that are known for their stability. Hardwoods usually maintain their shape better than softwoods. Additionally, consider using kiln-dried wood, as it is less prone to moisture changes that can cause warping.
Think About Finishing Options
Finishing can enhance the wood’s beauty and protect it from wear and tear. Some woods, like cherry or mahogany, tend to look better with varnish or oil finishes. Others might need paint or a stain to bring out their best features. Always think about how you want the final look to be when choosing your wood.
Be Mindful of Environmental Impact
Choosing wood sustainably demonstrates responsibility towards the environment. Look for woods that come from managed forests or are reclaimed. This not only helps the planet but can also result in unique character in your stool. Sustainable options like bamboo are also worth considering for an eco-friendly approach.
Budget Considerations
Wood prices can vary significantly depending on the type and availability. Before you fall in love with a specific wood type, consider your budget. Some hardwoods can be quite costly, while softwoods are generally more affordable. Factor in costs for additional materials needed too, including finishes or hardware.
Test the Wood’s Workability
Before committing to a particular type of wood, consider its workability. Some woods are easier to cut, sand, and finish than others. If you are a beginner, opting for a wood that is forgiving and easy to manipulate can make the process much smoother. Speak to suppliers about which woods are user-friendly for amateur woodworkers.
Consult a Local Supplier
Your local lumberyard or woodworking supply store can be an invaluable resource. They can provide insights on the best types of wood for your stool project based on your specifications and skill level. Don’t hesitate to ask for their advice or even sample pieces to get a feel for each wood type.
Making the right choice of wood for your stool project doesn’t have to be daunting. By carefully considering factors like purpose, weight capacity, aesthetics, and environmental impact, you can find the perfect material to ensure your project is both functional and beautiful. Take your time, ask questions, and enjoy the process!
Common Mistakes to Avoid When Building a Simple Stool
Building a simple wooden stool can be a rewarding project, perfect for beginners and experienced woodworkers alike. However, even the most straightforward task can have its pitfalls. Here are some common mistakes to avoid when constructing your stool.
Skipping the Planning Stage
Before you dive into cutting wood and assembling pieces, take the time to plan your design. Many people rush this crucial step, leading to a variety of issues. Make sure to sketch your stool, define its dimensions, and visualize how the components will fit together. This will help prevent mistakes that could ruin your final product.
Neglecting Material Quality
Using low-quality wood may seem cost-effective, but it can harm your project’s durability. Choose solid hardwood for strength, especially for the legs. Plywood or particleboard can be less stable over time and may not hold up well under weight. Here’s a quick list of recommended wood types:
- Oak
- Maple
- Cherry
- Birch
Investing in quality materials from the get-go will save you time and frustration later.
Inadequate Measuring and Marking
Precision is key when building a stool. Many beginners either underestimate the importance of accurate measurements or misread markers, leading to a troublesome assembly process. Always double-check your dimensions and use a good-quality measuring tape. Mark your cuts clearly with a pencil to ensure that each piece is cut accurately.
Using the Wrong Tools
Selecting inappropriate tools can complicate things too. Make sure you have the right equipment for cutting, drilling, and assembling your stool. For example, if you’re using screws, a power drill is a must-have. Here’s a basic toolkit you should consider:
- Measuring tape
- Pencil
- Saw (hand saw or power saw)
- Power drill
- Screwdriver
- Sandpaper or a sander
Using the right tools not only speeds up the process but also improves the overall quality of your work.
Ignoring Safety Measures
Woodworking can be hazardous, especially if you’re using power tools. Many people overlook safety precautions, which can result in injuries. Always wear protective gear, including goggles, gloves, and a dust mask. This ensures that you stay safe while enjoying your woodworking journey.
Overlooking Joinery Techniques
Simple stools can be built using various joinery techniques. Ignoring this can weaken your structure. Understand which joints will best suit your design, such as butt joints, dowels, or pocket holes. Each joint has its pros and cons, so choose wisely based on your skill level and the stool’s expected use.
Failing to Sand Properly
Once your stool is assembled, many skip the sanding process or rush through it. This leads to a rough finish that can splinter or snag clothing. Spend adequate time sanding all surfaces, especially edges and corners, to create a smooth finish. Use sanding blocks or a power sander for efficiency, and consider finishing with a finer grit for the perfect touch.
Ignoring Final Finishing Touches
Don’t neglect this step! A good finish is what will protect your wooden stool and enhance its appearance. Whether you choose paint, stain, or a clear varnish, ensure it complements your woodworking project. Apply multiple coats for better protection, and remember to let each coat dry adequately.
Failing to Test Stability
After completing your stool, it’s crucial to check its stability before using it. Sit on it gently and assess any wobble or rattle. If it feels unstable, consider reinforcing joints or adjusting any uneven legs. Taking this extra step will ensure your stool is safe and functional.
The process of building a simple wooden stool doesn’t have to be daunting. By avoiding these common mistakes, you can create a sturdy, visually appealing piece that will last for years. Embrace the learning curve, enjoy the craft, and remember that each project is a step towards improving your woodworking skills!
Creative Finishing Techniques to Enhance Your Wooden Stool Design
Creating a wooden stool can be a fulfilling project, but what truly brings your masterpiece to life is the finishing touch. The right creative finishing technique can enhance its design and elevate the aesthetics of any space. Whether you’re aiming for a rustic look or a sleek modern design, here are some innovative approaches to finish your wooden stool beautifully.
1. Natural Oil Finishes
Using natural oils like linseed or tung oil is a great way to accentuate the grain of the wood. These oils penetrate deeply, nourishing the wood while providing moisture resistance. Here’s how to use them effectively:
- Preparation: Sand the stool smoothly to ensure an even application.
- Application: Use a clean cloth to apply the oil in the direction of the grain.
- Drying: Allow it to dry completely before applying a second coat for added protection.
2. Staining Techniques
Staining can significantly alter the appearance of your stool, allowing you to match it to other furniture or make it a statement piece. Here are some techniques:
- Gel Stains: These thicker stains provide excellent control and are great for vertical surfaces.
- Water-Based Stains: Quick-drying and easy to clean up, these are perfect for beginners.
- Dip Staining: For a uniform color, consider dipping parts of your stool directly into the stain.
Testing your stain on scrap wood can help you decide the perfect color. Always remember to seal the stain with a protective finish afterwards.
3. Painting for a Pop of Color
If you’re looking to make your wooden stool stand out, painting is an excellent option. Here are a few tips on how to do it right:
- Choose the Right Paint: Use acrylic or chalk paint for optimal adhesion and durability.
- Color Mixing: Create custom colors by mixing primary colors to match your decor.
- Layering: For a whimsical effect, consider layering different colors and finishes. A matte finish over a glossy base creates depth.
Don’t forget to use a clear coating to protect your painted surface from scratches and stains.
4. Distressing Techniques
Distressing adds character and charm to your wooden stool. This can be done in several ways:
- Sanding: Lightly sand edges and corners for a naturally worn look.
- Using a Hammer: Randomly tap the surface to create small dents and marks.
- Paint Remover: Apply this to selectively remove paint or stain for an aged effect.
Distressed stools can fit seamlessly into farmhouse or shabby chic home interiors.
5. Decorative Techniques
Adding artistic elements to your stool design can make it a work of art:
- Decoupage: Adorn your stool with decoupage by applying cut-out paper designs, creating a unique pattern.
- Stencils: Use stencils to create geometric designs or shapes that complement your style.
- Wood Burning: Incorporate personal designs or patterns using a wood-burning tool for a lived-in, rustic feel.
These decorative techniques can showcase your creativity and personalize your wooden stool further.
6. Epoxy Resin Finishing
For a contemporary and sleek finish, consider using epoxy resin. This technique provides durability along with a glass-like finish that accentuates colors and textures:
- Mixing Resin: Follow the manufacturer’s instructions to mix resin and hardener properly.
- Pouring: Pour the epoxy over your stool’s surface, ensuring an even layer.
- Removing Bubbles: Use a heat gun or torch to eliminate bubbles as the resin cures.
The result is a glossy, modern finish that’s not only visually impressive but also resistant to scratches and stains.
Enhancing your wooden stool through creative finishing techniques not only improves visual appeal but also extends the longevity of your furniture. Whether you lean towards natural finishes, vibrant paint, or unique decorative methods, these finishing touches will help your stool stand out in any setting.
Conclusion
Crafting a simple wooden stool can be a rewarding project that combines creativity, function, and craftsmanship. By following the step-by-step guide, you can easily navigate through each phase of the construction process, ensuring that your stool is sturdy and stylish. Using the right tools and materials is crucial in achieving a professional finish, so be sure to gather everything from saws to screws before you begin.
Selecting the perfect wood can elevate your stool’s appearance and durability. Whether you choose hardwood for its strength or softwood for ease of work, the right choice will enhance the overall design. Along your journey, avoid common mistakes like miscalculating measurements or neglecting pre-drilling holes, as these pitfalls can lead to frustrating setbacks.
Once you’ve successfully built your stool, don’t forget to explore creative finishing techniques that can add a personal touch. Staining, painting, or simply sanding the wood can transform a basic design into a stunning piece of furniture that reflects your style.
With careful planning and attention to detail, making a simple wooden stool is not only achievable but also enjoyable. Whether you’re a novice or a seasoned DIY enthusiast, this project can result in a functional accessory for your home or a unique gift. Embrace the satisfaction of building something with your own hands and enjoy the beauty of your handcrafted wooden stool for years to come.