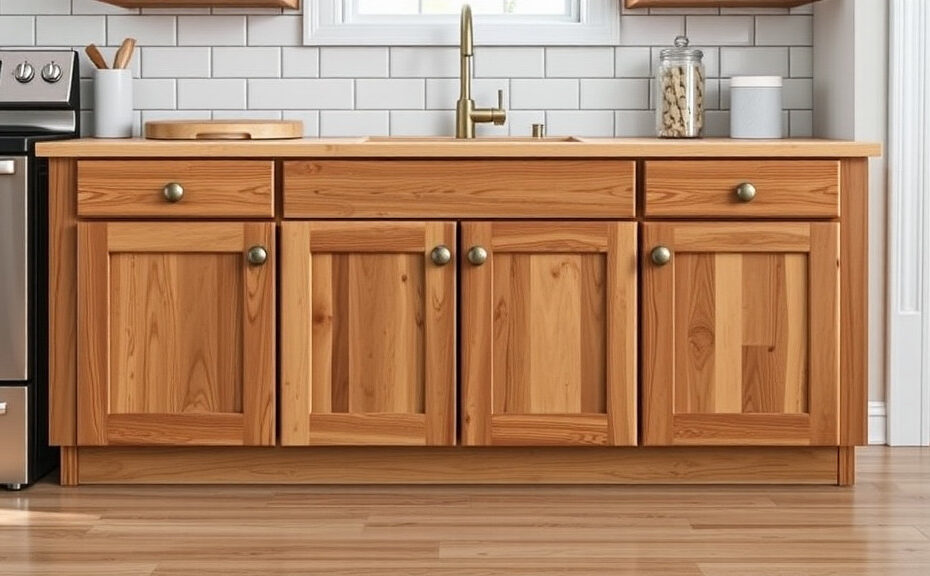
Effective Techniques on How To Build a Base for Cabinets to Sit On
Building a sturdy base for your cabinets is crucial for both functionality and aesthetics. A well-constructed base will elevate your cabinets and protect them from moisture and damage. If you’re ready to create a solid foundation for your cabinets, follow these effective techniques.
Gathering Your Materials
Before you start, ensure you have the right tools and materials at hand. Here’s a helpful list:
- Measuring tape
- Level
- Wood (2x4s usually work best)
- Wood screws
- Drill
- Circular saw
- Wood glue (optional)
- Sandpaper
- Paint or stain (for finishing)
Planning Your Base
Start by measuring the area where the cabinets will sit. Take precise measurements to determine the size of the base you need. Your base should be slightly larger than the cabinet base to provide stability. Sketch a design that includes:
- The dimensions of the base
- Placement of supports
- A method for leveling
Cutting the Wood
Once you have your design ready, it’s time to cut the wood. The most common choice is to use 2×4 lumber. Cut the wood into pieces that will form the frame:
- Two longer pieces for the front and back
- Two shorter pieces for the sides
- Additional supports as needed
Make sure to use a circular saw for clean cuts and take your time to ensure accuracy.
Assembling the Base
Now that you have your pieces cut, it’s time to assemble the base. Lay the longer pieces parallel and attach the shorter pieces at each end to create a rectangular frame. Use wood screws to secure the corners:
- Pre-drill holes to avoid splitting the wood.
- Consider using wood glue for extra strength.
Check that your frame is square by measuring diagonally from corner to corner. Adjust if necessary.
Installing Support Beams
To add extra support, especially for larger cabinets, install additional beams within the frame. These beams can run perpendicular to the longer pieces and should be spaced evenly depending on the weight of your cabinets. This will prevent sagging and provide a much stronger base.
Leveling the Base
One of the most important aspects of building a base is ensuring it is level. Using a level, check each side of your base after installation:
- Use shims to adjust any low areas.
- Recheck after adding any weight to ensure stability.
This step is vital because an unlevel base can cause cabinets to be uneven, affecting both appearance and functionality.
Finishing Touches
After securing the base and ensuring it is level, sand down any rough edges. You may want to paint or stain the wood to match your cabinetry and improve the look of your setup. Applying a finish can also protect the wood from moisture and other elements.
Installing the Cabinets
With the base complete, you can install your cabinets. Place them carefully on the base and ensure they are securely attached to both the wall and the base. Check once more for level during this step. If you’ve completed everything correctly, your cabinets should fit neatly, look great, and function perfectly for years to come.
By following these effective techniques on how to build a base for cabinets to sit on, you can ensure a solid and attractive installation. A sturdy base not only enhances the lifespan of your cabinetry but also elevates the overall appeal of your space. Happy building!
Essential Tools Needed for Cabinet Base Construction
Building a solid base for your cabinets requires the right set of tools, which can help you achieve a professional finish while ensuring your project runs smoothly. Whether you’re a seasoned DIY enthusiast or a beginner, knowing what tools to gather can make all the difference. Here’s what you need:
1. Measuring Tools
Accurate measurements are vital for a successful cabinet base construction. You should have:
- Tape Measure: A standard 25-foot tape measure will help you measure distances accurately.
- Square: A framing square is essential for ensuring your cuts are at precise right angles.
- Level: A bubble level helps ensure that your cabinet base is perfectly horizontal, which is key for the stability of the cabinets.
2. Cutting Tools
Next, you’ll need cutting tools to shape the materials you’ll be working with.
- Circular Saw: This tool is perfect for cutting large sheets of plywood or boards to the required dimensions. Choose one with a fine-toothed blade for smoother cuts.
- Miter Saw: Ideal for making precise angled cuts, especially for corner joints.
- Jigsaw: If you need to make intricate cuts or curves in your materials, a jigsaw will be handy.
3. Fastening Tools
These tools help secure your cabinet base together.
- Power Drill: A good-quality power drill is crucial for drilling holes and driving screws. Look for one that offers both drilling and screw-driving functions.
- Screwdriver Set: A set with both Phillips and flat-head screwdrivers will be useful for tight spots.
- Nail Gun: If you’re working on a large project, a nail gun can speed up your assembly process significantly.
4. Safety Gear
Safety should always be a priority when working with tools.
- Safety Glasses: Protect your eyes from sawdust and debris that can fly up while cutting.
- Ear Protection: Noise from power tools can be harmful, so use earmuffs or earplugs.
- Dust Mask: A mask will help you avoid inhaling dust, especially when sanding or cutting wood.
5. Assembly Tools
Once you’ve cut everything to size, assembly tools will come into play.
- Clamps: Woodworking clamps are essential for holding pieces in place while you secure them together.
- Wood Glue: Adding wood glue to joints enhances the strength of your cabinet base. Make sure to choose a strong wood adhesive.
- Measuring Square: Besides measuring, using a square can also verify that edges are properly aligned during assembly.
6. Finishing Tools
To achieve a polished look for your cabinet base, a few finishing tools will come in handy.
- Sander: Use an electric sander for a smooth finish. You can switch between coarse and fine sandpaper for the best results.
- Paintbrush or Roller: If you plan to paint or stain your cabinets, have quality brushes or rollers ready.
- Drop Cloths: Protect your work area from splashes and droppings, whether you’re painting or assembling.
7. Additional Tools
A few extra tools can enhance your efficiency:
- Work Light: Good lighting helps you see what you’re working on, especially in dim spaces.
- Toolbox: Organizing your tools and keeping them accessible will save you time and frustration.
By gathering these essential tools, you equip yourself for a smooth and successful cabinet base construction project. Remember, take your time and prioritize safety as you dive into your project. Happy building!
Common Mistakes to Avoid When Building a Cabinet Base
Building a sturdy and reliable base for your cabinets can significantly enhance their functionality and longevity. However, many homeowners encounter common pitfalls during this process that can lead to frustration and extra costs. By understanding and avoiding these mistakes, you can ensure that your cabinet base is built correctly and will serve its purpose for years to come.
Choosing Incorrect Materials
One of the primary mistakes people make is selecting the wrong materials for the cabinet base. You should choose materials that are durable and suitable for the environment where you are installing the cabinets. For instance, if you’re building a base in a kitchen or bathroom, opting for moisture-resistant wood or plywood is essential. Avoid using materials that may warp, swell, or deteriorate from exposure to humidity.
Not Measuring Properly
Accurate measurements are vital when building a base for cabinets. Many individuals skip the measuring step or rush through it, leading to discrepancies during installation. To avoid this mistake:
- Take precise measurements of your cabinets and the space available.
- Double-check your measurements before cutting any materials.
- Consider potential obstructions, such as electrical outlets or plumbing.
By ensuring measurements are accurate, you can avoid cutting materials repeatedly and wasting resources.
Forgetting Leveling and Support
Another common error is neglecting the importance of leveling. Cabinets need a strong, even foundation for optimal function. If the base is not leveled, it can lead to misaligned cabinet doors and drawers, making them difficult to open or close. Here’s how to ensure proper leveling:
- Use a level tool to check your base during and after assembly.
- Adjust the legs of the cabinets if necessary, ensuring all surfaces are flat.
Additionally, provide adequate support beneath your cabinets, particularly for heavier items. Failing to do this can result in sagging over time, leading to further issues down the road.
Ignoring Ventilation
In many cases, builders forget about ventilation. Poor airflow can result in mold growth or unpleasant odors, especially in areas subject to moisture. Make sure to create spaces for air circulation around your cabinets. You can achieve this by leaving small gaps between the base and the floor or ensuring proper airflow between multiple cabinet sections.
Overlooking the Importance of Fasteners
Using insufficient or inappropriate fasteners may lead to a shaky cabinet base. When constructing your base, be mindful of the following:
- Select screws or nails that are appropriate for the material you are using.
- Space your fasteners evenly to ensure maximum strength and durability.
- Consider the weight load of the cabinets and ensure that the fasteners can handle it.
Neglecting the Floor Surface
The surface beneath your cabinets is just as important as the materials you use for your base. Many individuals do not assess the condition of the floor before building the cabinet base. Here are a few tips to consider:
- Check for unevenness in the floor.
- Repair any damage, such as cracks or holes, before installation.
- Consider using underlayment to provide a buffer between the floor and the cabinet base.
Rushing the Construction Process
Building a cabinet base is not a task to hurry through. Rushing can result in mistakes that may compromise the entire project. Take your time to understand each step and follow through carefully. If you’re unsure about any part of the process, consider seeking help from a professional or doing additional research.
Failure to Account for Future Changes
Do not forget to think ahead about potential changes in your space or needs. If you frequently change your kitchen layout or update your cabinetry, consider a flexible design for the cabinet base that can accommodate future shifts. Avoid building a base that is too restrictive for your needs; instead, allow room for growth.
By avoiding these common mistakes, you can build a solid and functional cabinet base. Investing the time to plan, measure, and construct with care will ultimately lead to a beautiful and durable installation.
Choosing the Right Materials for Your Cabinet Base
When building a sturdy base for your cabinets, selecting the right materials is crucial to achieving durability and aesthetic appeal. The type of material you choose will affect not only the functionality of your cabinets but also their longevity. Here’s a comprehensive guide to help you understand the best materials for your cabinet base.
Wood
Wood is one of the most popular choices for cabinet bases due to its strength and versatility. Different types of wood can be used, each providing its unique benefits:
- Hardwoods: Maple, oak, and cherry are excellent choices for a cabinet base. They are incredibly strong and can withstand heavy loads. Moreover, hardwoods offer beautiful finishes that can elevate the overall look of your cabinetry.
- Plywood: A combination of different wood layers glued together, plywood is a cost-effective option that maintains durability. It resists warping better than solid wood and is less likely to crack.
- Particleboard: Made from wood particles and glue, this is the most affordable option. However, it’s less sturdy than plywood and hardwoods, making it better suited for areas with less traffic.
Metal
For those seeking modern aesthetics, metal is becoming increasingly popular for cabinet bases.
- Steel: Offering high strength and resistance to wear and tear, steel bases can support heavy cabinets easily. They’re often used in commercial settings where durability is essential.
- Aluminum: Lightweight and resistant to corrosion, aluminum can provide a sleek, contemporary look. However, ensure it is adequately treated to withstand any potential dents or scratches.
Composite Materials
Composite materials blend various substances to deliver unique features. They can offer benefits that individual materials may lack:
- Medium Density Fiberboard (MDF): This engineered wood product is made from finely glued wood fibers. It’s smooth and ideal for paint, lending a clean finish to your cabinets. However, keep it away from moisture, as it can swell.
- Laminate: Often used as a veneer over MDF or particleboard, laminate offers a durable and easy-to-clean surface. It’s available in various styles and colors, offering flexibility in design.
Considerations for Selecting Materials
As you make a decision on which material to choose for your cabinet base, consider the following factors:
- Load-Bearing Capacity: Think about the weight your cabinets will hold. If you have heavy dishware or appliances, opt for materials with a higher load-bearing capacity.
- Exposure to Moisture: In areas like kitchens or bathrooms, moisture can be a significant concern. Choose materials that can resist moisture, like treated plywood or laminate.
- Aesthetics: The material you choose will affect the look of your cabinets. Wood provides a warm, classic feel, while metal can offer a modern touch.
- Budget: Different materials come with varying price points. Ensure your choice fits within your budget while still providing the required durability.
- Ease of Maintenance: Some materials require more upkeep than others. Make sure you choose one that aligns with how much time you’re willing to dedicate to maintenance.
Finishing Touches
Once you’ve selected the right material for your cabinet base, it’s essential to consider how you will finish it. Applying sealants, paints, or varnishes can enhance appearance and durability. Here are a few options:
- Sealants: Protects against moisture and wear.
- Paints: Great for aesthetic customization and can provide a fresh look.
- Varnishes: Adds a glossy finish while offering a layer of protection.
Selecting the right materials for your cabinet base may seem daunting, but by considering your needs and the information provided, you can make an informed choice. Remember that the material you choose will serve a functional purpose while also contributing to the overall design of your home.
How to Ensure Proper Stability and Alignment for Cabinets
Installing cabinets can transform your kitchen or workspace, but ensuring proper stability and alignment is key to achieving that polished look. To help you through this process, here are essential steps and tips to keep your cabinets standing tall and looking straight.
First and foremost, it’s crucial to prepare your workspace. Make sure the wall where the cabinets will hang is clean and free from debris. Measure the height and width of your cabinets accurately using a level and tape measure, making sure to take into account any irregularities in the wall. This initial step can prevent future headaches down the line.
Gather the Right Tools and Materials
Before you start, have these tools ready:
- Tape measure
- Level
- Drill and drill bits
- Screws or cabinet-fastening hardware
- Stud finder
- Wood shims
- Clamps
- Screwdriver
With the right tools at your disposal, you can ensure that your cabinets will be secure and properly aligned.
Find the Studs in Your Walls
Finding studs in your walls is essential for both stability and alignment. Use a stud finder to locate these vertical beams behind your walls. Mark these spots with a pencil. Installing your cabinets directly into the studs will help support their weight, making them less likely to sag over time.
Level and Mark the Cabinets’ Positions
After locating the studs, hold your cabinet in position and use a level to check that it is perfectly horizontal. If your cabinets will be stacked, you’ll want to repeat this step for each cabinet unit. Draw a light pencil line along the top edge of the cabinet against the wall. This line serves as a guide to make certain everything stays level.
Install the Wall Cabinet First
If you’re installing multiple cabinets, always start with the wall-mounted units. Align your cabinet with the marked line and the studs, and attach it securely using the drill and screws. Remember to use wood shims if there’s a slight gap behind the cabinet or if the wall isn’t perfectly straight. Place shims under the base of the cabinet to ensure it remains level.
Using a Level Throughout the Process
As you secure each cabinet, keep checking with the level. Adjust the cabinet with more shims if necessary to maintain perfect alignment. This attention to detail is what will provide the strength and durability you need for your cabinets.
Attach the Bottom Cabinets
Once your wall cabinets are secured, it’s time to move on to the bottom cabinets. Like before, start by checking for studs and leveling the cabinet. Attach the bottom cabinets to each other using clamps to hold them together as you secure them to the wall.
Ensuring Proper Spacing and Gaps
Remember, a little gap between cabinet doors and the wall or other cabinets is normal. This helps with ventilation and allows for expansion and contraction. Aim for a uniform gap on both sides for achieving a streamlined look.
Finishing Touches
Once your cabinets are installed, check once more for level and stability. Tighten any loose screws and ensure that all cabinets align. If you have doors that need adjusting, most cabinet hinges have adjustable settings to make fine-tuning easy. Don’t forget to properly caulk or fill in gaps between the cabinets and the wall to achieve that professional finish.
By taking the necessary steps to ensure proper stability and alignment for your cabinets, you can enjoy both functionality and aesthetics. Following these guidelines, your cabinets will not only stay in place but will also look fantastic in your space.
Conclusion
Building a sturdy base for cabinets is a crucial step in any cabinetry project. By employing effective techniques such as careful measurements and precision cutting, you set the foundation for successful installation. Utilizing the essential tools—such as a level, saw, and drill—will enable you to construct a durable base that meets your project needs.
Avoiding common mistakes, like incorrect height measurements and inadequate support, will save you time and frustration. Remember, it’s important to take the time to plan and execute each step thoughtfully. Choosing the right materials, such as plywood or solid wood, not only contributes to the durability of your cabinet base but also enhances the overall aesthetic of your space.
Stability and alignment are key considerations when building your cabinet base. Ensure that your base is leveled properly and securely attached to the wall to support the weight of the cabinets. Taking these steps will lead to a beautifully finished project that functions well for years to come.
By following these guidelines, you’ll create a strong, aligned foundation for your cabinets. Whether you’re a DIY enthusiast or a seasoned pro, focusing on these aspects will enhance your woodworking skills and lead to a successful cabinet installation that you can be proud of. Happy building!