Step-by-Step Guide on How to Build a Barn Style Door
Are you looking to add a touch of charm to your home with a barn style door? Building one is simpler than you might think! With the right materials, tools, and a little bit of time, you can create a stunning focal point that enhances the aesthetics of any room. This guide walks you through each step of the process. Let’s get started!
Materials Needed
- Wood boards (1×4 or 1×6 boards for the frame)
- Plywood or solid boards for the door panel
- Wood glue
- Nails or screws
- Wood stain or paint (optional)
- Door hardware (track, rollers, and handles)
Tools Required
- Measuring tape
- Level
- Saw (circular saw or miter saw)
- Drill
- Sander
- Paintbrush (if painting or staining)
Step 1: Measure Your Opening
Start by measuring the doorway where you want to hang your barn door. Take precise measurements of the height and width. It’s a good idea to add a few inches to the width for a larger overhang that enhances the barn door look.
Step 2: Cut Your Wood
Cut your wood to size according to your measurements. You will need enough boards to form the frame and the door panel. Typically, the frame consists of two vertical and two horizontal pieces, with a solid or plywood panel filling the center.
Step 3: Assemble the Frame
Using wood glue, assemble your frame. Place the vertical boards on the outside and the horizontal boards across the top and bottom. Ensure everything is square by checking with a level. Use nails or screws to secure the joints firmly.
Step 4: Attach the Door Panel
Once the frame is ready, attach the door panel. If you’re using plywood, cut it to fit snugly within the frame. Secure it with wood glue and additional nails or screws along the edges of the frame to prevent any movement.
Step 5: Sand and Finish
Once the door is fully assembled, it’s time to sand it down. Smooth out any rough edges or surfaces to ensure a polished finish. Once you’re satisfied with the sanding, apply your desired paint or wood stain. Let it dry completely as per the manufacturer’s instructions.
Step 6: Install the Hardware
Now that your door is finished, it’s time to install the hardware. Attach the track at the top of the door frame, ensuring it’s level. Next, mount the rollers to the top of the door and slide them onto the track. Follow the hardware instructions for precise installation.
Step 7: Hang the Door
Once you have installed the track and rollers, lift your door onto the track. Make any adjustments needed to ensure it glides smoothly. You may also want to install a door handle or pull for easy use.
Step 8: Final Adjustments
Check the door’s alignment with the wall and make any necessary adjustments to the tracking system. Ensure that the door opens and closes without any obstructions. This step is crucial for functionality.
Additional Tips
- Consider adding decorative elements like barn door hinges for an authentic look.
- Regularly check the door hardware to ensure it is secure and operating smoothly.
- If you’re unsure about any step, watch tutorial videos or consult with a local hardware store for additional advice.
Building your own barn style door can be a rewarding DIY project. Not only does it add rustic charm to your home, but it can also serve practical purposes, like saving space in tight areas. With this step-by-step guide, you are well on your way to creating a beautiful barn door that will impress family and friends alike. Enjoy your new creation!
Essential Tools and Materials Needed for Building a Barn Style Door
Building a barn style door can be a fun and rewarding project for anyone who enjoys woodworking and home improvement. It brings a rustic charm to any space, whether it be a house, apartment, or shed. To get started on your barn door journey, it’s important to gather the essential tools and materials. This guide will outline what you need to create a stunning barn style door, ensuring your project runs smoothly.
Tools You Will Need
Here’s a list of must-have tools to have on hand:
- Miter Saw: A miter saw is essential for making precise angled cuts in your boards. If you want clean and accurate cuts, this tool is a must.
- Circular Saw: This tool is great for cutting larger sheets of wood. It provides flexibility in terms of cutting angles and depths.
- Drill or Impact Driver: You will need a powerful drill to create holes for screws and a driver for fastening the pieces together securely.
- Measuring Tape: A reliable measuring tape will help you take accurate measurements, which is crucial when fitting the door to its space.
- Level: To ensure your door hangs straight and operates smoothly, a level is necessary.
- Smooth Sanding Block or Power Sander: Sanding your wood pieces is important for a nice finish. A power sander can speed up the process.
- Pencil and Square: Use a sharp pencil for marking cut lines and a square to make sure your corners are right angles.
- Clamps: Clamps hold your pieces in place while you work, ensuring everything stays aligned.
- Safety Gear: Always wear safety glasses and ear protection. Safety should be your top priority when working with power tools.
Materials Required
Along with the right tools, you will need several materials to construct your barn style door. Here’s what to have prepared:
- Wood: You can choose from various wood types like pine, oak, or cedar. The thickness and durability depend on where you’ll use the door.
- Wood Screws: Wood screws are necessary for assembling the frame and securing the planks together.
- Decorative Hardware: Consider adding rustic hinges, door pulls, and sliding tracks. They contribute to the overall look of the barn door.
- Wood Finish or Stain: A stain or finish brings out the natural beauty of the wood and protects it from wear and tear.
- Wood Glue: Using wood glue along with screws enhances the bond between pieces and adds strength.
Getting Started
Now that you have your tools and materials, you can start building your barn style door. Begin by measuring the opening where the door will hang. This ensures you cut the wood to the right dimensions. Once you have your measurements, cut the wood accordingly.
Next, assemble the frame using wood screws and wood glue for added durability. It’s wise to position each plank accurately. You can use clamps to hold everything tight while you work. Ensure the frame is level and squared as you go.
After assembling the frame, sand down any rough edges, making the surface smooth to the touch. This step is vital, especially if you’re planning to apply a finish or stain later on.
Final Touches
When the door is built, you can apply your chosen finish or stain. This not only enhances its appearance but also protects the wood from moisture and damage. Allow it to dry completely before attaching the hardware.
Install the decorative hardware you selected. Make sure everything is tight and securely fastened. After installation, test the door to ensure it slides smoothly and operates properly.
Building a barn style door requires careful planning and the right tools and materials. By following this guide, you will be equipped to create an eye-catching addition to your space that highlights your personal style. Remember to take your time and enjoy the process; it’s a chance to showcase your skills and artistry!
Design Options: Customizing Your Barn Style Door
If you’re looking to enhance the charm of your home, a barn style door might just be the perfect addition. These doors not only serve a functional purpose but also add a rustic aesthetic. Customizing your barn style door allows you to reflect your personality and fit your home decor. Here are some design options to consider when embarking on your customization journey.
Material Choices for Your Barn Door
The first step in customizing your barn style door is choosing the right material. Each option brings its unique look and feel. Here are some popular materials:
- Wood: Traditional wood doors give a classic and warm appearance. You can choose from various types of wood, including pine, cedar, or reclaimed wood for an eco-friendly option.
- Metal: For a more industrial look, consider a metal door. Steel or aluminum doors provide durability and can be painted in any color to match your design scheme.
- Composite: An ideal choice for those seeking low maintenance, composite materials combine wood fibers and plastic. They mimic the look of wood while being resistant to moisture.
Choosing the Right Finish
The finish you select greatly impacts the overall look of your barn style door. Here are a few finishes to consider:
- Natural Stain: This option enhances the natural beauty of the wood while allowing grain patterns to shine through. Choose a stain that complements your existing decor.
- Paint: Painting your barn door in a bold color can act as a statement piece. Consider popular shades like deep blue, forest green, or classic white for a more timeless look.
- Distressed Finish: For a vintage feel, a distressed finish adds character. You can achieve this look by sanding areas of the door or using special paint techniques.
Hardware Selection
No barn style door is complete without the right hardware. The hardware you choose can dramatically change the door’s appearance. Here are some common hardware styles:
- Slides: Traditional sliding hardware allows the door to glide smoothly along a track. You can opt for a modern steel track or a rustic wooden one.
- Handles: Handles come in various designs, from sleek and modern to wrought iron for a more classic approach.
- Hinges: If you prefer a swung barn door, selecting decorative hinges can enhance the overall style. Look for ornate designs or go for simple, clean lines.
Door Style Options
The style of the door itself is another important aspect of customization. Here are a few options to explore:
- Single Door: This is a standard option that works well in tighter spaces. It’s an excellent choice for entrances to smaller rooms or closets.
- Double Doors: If you have a wider opening, double barn doors can create a grand entry. They offer a dramatic effect and are perfect for larger spaces like dining areas.
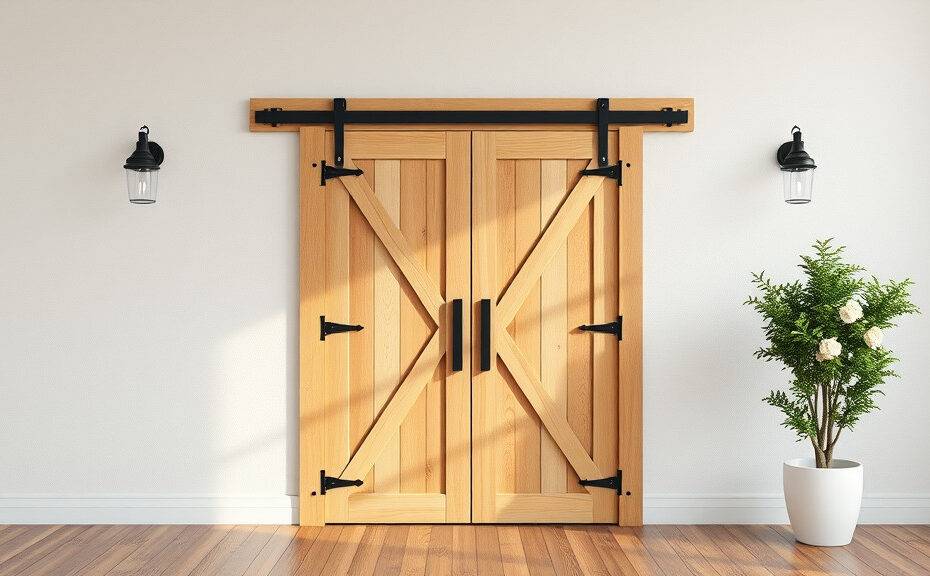
- Crossbuck Design: Featuring a diagonal pattern, crossbuck doors provide a classic barn look and add visual interest.
- Flat Panel: For a more modern take, flat panel barn doors offer a minimalist appearance, allowing for subtle elegance.
Glass Elements
Adding glass to your barn style door can increase natural light and enhance the open feel of your space. Here are a few ways to incorporate glass:
- Partial Glass Panels: Use glass panels as part of the design. Whether framed or a full insert, it allows light while maintaining privacy.
- Frosted Glass: Opt for frosted glass if you want to diffuse light while still having some level of privacy.
- Arched Glass Tops: An arched top adds a touch of elegance. Combine this with wooden frames for a perfect blend of traditional and contemporary styles.
When customizing your barn style door, remember the key is to create a piece that sings in harmony with your home while serving your needs. Consider what you love about barn doors and how you can express that in your design. With various options available, from materials to finishes and styles, your ideal barn door is within reach.
Common Mistakes to Avoid When Building a Barn Style Door
When designing and building a barn style door, it’s easy to get caught up in the excitement of the DIY project. However, certain pitfalls can hinder the overall success of your build. Recognizing and avoiding these common mistakes will ensure that your door looks great and functions effectively.
One of the most frequently overlooked aspects is measuring accurately. Incorrect measurements can lead to a door that is either too large or too small for the intended space. Always double-check your measurements before cutting any materials. Use a tape measure and a square to ensure both width and height are spot on. This precision will save time and frustration during installation.
Another mistake many make is neglecting the choice of materials. Barn style doors can be made from various materials, such as wood, plywood, or metal, but not all are suitable for your specific environment. For instance, if you live in a humid area, selecting untreated wood can lead to warping or rotting over time. Choosing the right type of wood that complements your climate can enhance durability and longevity.
Many DIYers forget to consider the door’s weight and how it will be supported. Barn style doors can be quite heavy, especially when using solid wood panels. Make sure your track system is rated for the door’s weight and that it’s properly installed. An inadequate track can lead to the door falling, posing a safety risk and causing damage.
Another area of oversight often relates to the finishing and staining of the door. Skipping this step can leave your door looking unfinished and unprotected against the elements. Properly treating the wood not only enhances the appearance but also protects it from wear and tear over time. Be sure to choose a finish that complements your décor style while offering optimal protection.
If you’re using hardware like handles or locks, it’s vital to correctly position these elements. Misalignment of hardware not only looks unprofessional but can also affect function. Take time to plan where each piece will go before drilling any holes. Measure twice and install once to ensure everything sits perfectly in place.
In addition, consider the door’s swing direction before construction. Many people assume which way the door should open without considering the space available. Take time to analyze your room and how the door will function in relation to furniture or other elements. Deciding on the proper swing will enhance usability and aesthetics.
Another common mistake occurs during the installation phase. DIY builders often rush this part of the project, leading to installation errors. Before you get started, read the instructions carefully, or consult a video for visual guidance. Take your time to ensure each component is installed securely and leveled correctly.
A mistake that can easily be fixed is not allowing for proper expansion and contraction of wood. All wood expands and contracts with changes in temperature and humidity. Failing to account for this can lead to issues such as gaps, squeaking, or even the door sticking. Include a small gap in your measurements that allows the wood to "breathe."
Many people overlook the importance of maintenance. After building your barn style door, it’s important to commit to regular upkeep. Check the hardware frequently to ensure it remains tight and functional. Periodically reapply the finish as needed to protect the door and keep it looking its best.
By avoiding these common mistakes, you will be well on your way to building a beautiful and functional barn style door that enhances your home. From accurate measurements and the right choice of materials to thoughtful installation and maintenance, each step plays a crucial role in your successful DIY project. Take your time, plan carefully, and enjoy the craft of creating a stunning addition to your space.
Maintenance Tips for Keeping Your Barn Style Door Looking Great
Owning a barn style door adds charm and character to your home, but maintaining its beauty requires some effort. Follow these practical tips to keep your barn style door looking great for years to come.
Regular Cleaning
Dust and dirt can accumulate on your barn door, diminishing its appeal. Here’s how to keep it clean:
- Use a soft cloth: A microfiber cloth works best to avoid scratches.
- Choose the right cleaner: Use a mild soap solution or wood cleaner specifically designed for finishes.
- Wipe down weekly: Regularly dusting helps prevent buildup and keeps it looking fresh.
Inspect for Wear and Tear
Periodically checking your barn style door for damage can save you time and money down the road. Here’s what to look for:
- Check for scratches: Wooden surfaces can easily get scratched. Feel for rough spots and smooth them out with fine sandpaper.
- Look for loose hardware: Ensure all hinges and bolts are tight. Loose parts can cause the door to hang unevenly or affect its function.
- Assess for moisture damage: If your door is exposed to humidity, check for warping or swelling. Address any issues immediately to prevent further damage.
Protective Finishes
Applying a protective finish is crucial for preserving the wood and enhancing its color. Here are some effective options:
- Use a sealant: A good wood sealant can protect against moisture and dirt. Make sure to choose a product specific for barn doors.
- Consider staining: If you want to refresh the color of your door, staining can enhance its natural beauty while also offering protection.
- Reapply every few years: Depending on your climate, you should reapply the finish every 2-3 years to maintain the look and resistance of your door.
Maintain Hardware
The hardware of your barn style door plays an essential role in its overall functionality and appearance.
- Lubricate tracks and rollers: Use a silicone-based spray or graphite powder to keep the door sliding smoothly.
- Check for rust: Inspect metal components regularly for signs of rust. Treat and repaint any affected areas to prevent further corrosion.
- Think about updates: If the hardware looks outdated, consider modernizing it with new handles or brackets to enhance the door’s appearance.
Seasonal Maintenance
Adapting your maintenance routine based on the seasons can prolong the life of your barn style door.
- Winter care: Ensure your door is sealed and weather-proofed to protect against cold air and moisture.
- Summer attention: Check for warping due to heat. If necessary, prop the door open occasionally during the hottest days to let heat escape.
- Spring cleaning: Conduct a thorough clean in spring to remove any dust or grime built up during winter.
When to Seek Professional Help
Sometimes, maintenance tasks may require expertise. Recognizing when to reach out for professional assistance can save you from costly repairs.
- Significant damage: If your door has severe scratches, fractures, or extensive water damage, call an expert.
- Hardware replacements: If you’re not comfortable working with door mechanics, a professional can safely install or repair hardware.
- Restoration needs: If you want to restore an antique barn door, consider hiring a skilled craftsman who specializes in restoration work.
With a little regular attention and care, your barn style door can remain a stunning focal point in your home. Following these guidelines will help it withstand the test of time while maintaining its rustic charm.
Conclusion
Building a barn-style door is an exciting project that can elevate the charm of your home. By following the step-by-step guide provided, you can confidently create a striking focal point that blends functionality with aesthetics. Remember to gather all essential tools and materials before starting to streamline your process and ensure a smooth build.
Consider personalizing your barn door with various design options, from paint colors to hardware choices. This customization allows you to match the door to your home’s existing decor while adding a unique touch. Keep in mind some common mistakes that novice builders often make, such as improper measurements or poor selection of materials. Avoiding these pitfalls will save you time and frustration in the long run.
Once your barn door is complete, maintaining its appearance is crucial. Regular cleaning and occasional adjustments will keep it functioning well and looking pristine.
Creating a barn-style door can be a rewarding DIY project. By applying the knowledge and tips shared in this article, you’ll be equipped to build a door that not only enhances your space but also stands the test of time. Enjoy the process, and don’t hesitate to embrace your creativity along the way!