Step-by-Step Guide on How to Build a Barn Door for a Closet
Building a barn door for your closet can transform your space into something stylish and functional. Not only does it save space, but it also adds rustic charm to any room. Follow this detailed guide to create your own barn door effortlessly.
Before you start, gather all necessary tools and materials. Here’s a quick checklist:
- Wood for the door (pine, oak, or plywood)
- Door hardware (track and rollers)
- Screws and wood glue
- Paint or wood stain
- Saw (circular or miter saw)
- Drill
- Measuring tape
- Level
- Sandpaper or power sander
Now, let’s dive into the step-by-step process of building your barn door.
Step 1: Measure Your Closet Opening
First, measure the width and height of your closet opening. You will want your barn door to be at least 2 inches wider than the opening itself and at least as tall as the opening. This ensures complete coverage and makes your door more forgiving to alignment issues.
Step 2: Choose Your Wood
Select your wood type based on your desired aesthetic. Pine is budget-friendly, while oak offers durability and elegance. Decide if you prefer a single, solid piece of wood or planks for a more rustic look.
Step 3: Cut the Wood
Using your saw, cut the wood to your measurements. If you’re using multiple planks, make sure all pieces are equal in width. You can use a straight edge to guide your cuts and ensure they are clean and accurate.
Step 4: Assemble the Door
Start by laying out your pieces on a flat surface. If using planks, arrange them side by side to create your door. Apply wood glue between the pieces and secure them with screws. If you’re using a solid piece of wood, this step is straightforward—just make sure it’s sturdy.
Step 5: Sand the Surface
Next, sand the surfaces of the wood. This gives it a smooth finish and prepares it for staining or painting. Pay special attention to the edges and corners, which should be rounded for safety and aesthetics.
Step 6: Finish the Wood
This is where you can get creative. Choose to paint or stain your barn door to match your room decor. Apply your chosen finish with a brush or cloth and let it dry as per the manufacturer’s directions. A good finish not only beautifies but also protects the wood.
Step 7: Install the Hardware
Once your door is dry, it’s time to attach the hardware. First, install the track above the doorway. Use a level to ensure it’s straight before securing it to the wall. Following this, attach the rollers to your door. Be sure to refer to the manufacturer’s instructions for specific hardware guidelines.
Step 8: Hang the Door
With the track in place, lift your door onto the rail. Adjust the rollers so that the door moves smoothly along the track. Test it out several times to ensure it’s operating correctly.
Step 9: Add Stops and Handles
Install the door stops on either end of the track to prevent the door from sliding off. Choose a handle that complements the design of your door and space—this could be a rustic handle for a farmhouse feel or sleek hardware for a modern touch.
Now, step back and admire your handiwork! Building a barn door for your closet not only enhances your storage solution but also adds an eye-catching element to your decor.
Remember, customizing your barn door adds a personal touch to your project. Consider adding windows or decorative accents for a unique finish. This guide should provide you with the fundamentals, allowing you to inject your own creativity into this project.
Essential Tools and Materials Needed for Your Barn Door Project
Building a barn door for your closet can be a fun and rewarding project. Not only does it enhance the aesthetic of your space, but it also provides a functional way to save space. To ensure your barn door project goes smoothly, it’s important to gather all the essential tools and materials before you get started. Here’s a comprehensive look at what you’ll need for this DIY endeavor.
Tools You Will Need
Having the right tools is crucial for any home improvement project. Here’s a list of essential tools you should have on hand:
- Measuring Tape: This will help you accurately measure the dimensions of your closet space and the barn door itself.
- Level: A level ensures that your barn door hangs evenly, preventing any awkward gaps or misalignments.
- Power Drill: This tool is essential for making pilot holes and driving screws into wood. Look for a drill that comes with both drill bits and screw bits.
- Circular Saw: A circular saw is perfect for cutting your wood panels to size. Ensure you have the right blade for a clean cut.
- Miter Saw: Use this saw for making precise, angled cuts. This can be beneficial if you choose to trim your barn door for a custom look.
- Sandpaper or Sander: Sanding the edges and surfaces of the wood will give your barn door a smooth finish and help it paint or stain evenly.
- Paintbrush or Roller: If you plan to paint or stain your barn door, having the right applicators will help you achieve a professional look.
- Screwdriver: A proper screwdriver will allow you to tighten all screws securely after they are drilled in.
Materials for Your Barn Door
Choosing the right materials is equally important. Here’s a list of materials you will need to create your barn door:
- Wood Panels: Select the type of wood you want for your door. Popular choices include pine, cedar, and oak. Each type has its own look and durability.
- Wood Glue: Wood glue adds extra strength to your joints. This can help your barn door stay sturdy over time.
- Screws: Select screws that are suitable for the thickness of your wood panels. They should also be compatible with your chosen hardware.
- Barn Door Hardware Kit: A good hardware kit will include the hanging track, brackets, rollers, and stops. Research and choose a kit that suits your design preferences.
- Finishing Products: Whether you plan to paint or stain, make sure to have the right products ready. This could include primer, paint, and sealers.
Additional Considerations
Before diving into your project, consider the following additional items:
- Protective Gear: Safety glasses and gloves are wise to have. They will protect you from dust and flying debris while you work.
- Drop Cloth: If you’re painting or staining, a drop cloth will protect your floors from spills and splatters.
- Clamps: These are helpful in securing wood pieces while the glue dries or as you add screws.
- Work Table: A sturdy surface will make your cutting and assembling easier. If you lack space, consider using saw horses paired with a plywood sheet.
With the right tools and materials, your barn door project could be seamless and enjoyable. Be sure to take measurements carefully, and don’t rush through any steps. Enjoy the process and the transformation of your closet with a beautiful barn door!
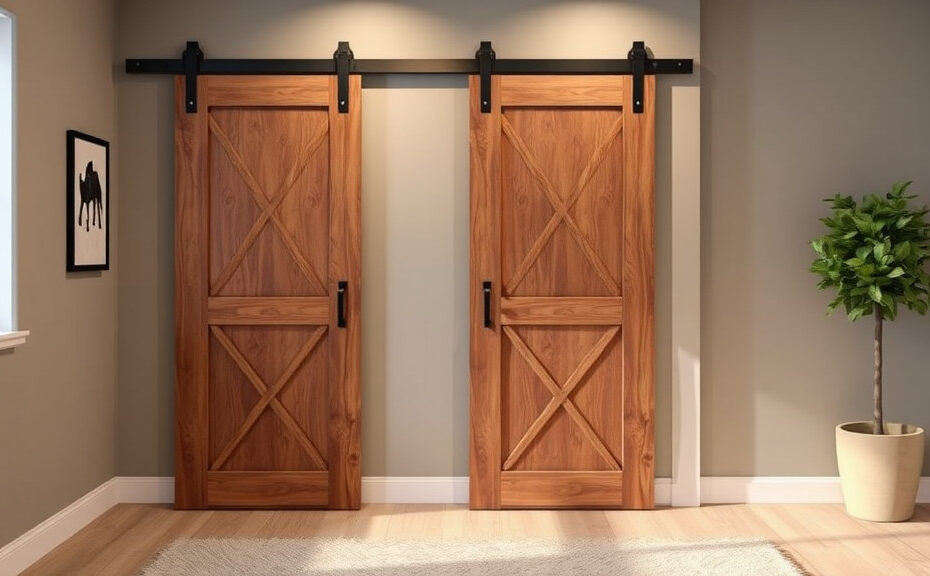
Design Inspiration: Styles and Finishes for Your Closet Barn Door
When considering how to enhance your closet’s aesthetic and functionality, a barn door can serve both purposes beautifully. It adds a rustic charm while providing easy access to your wardrobe. However, selecting the right design inspiration, styles, and finishes is key to ensuring that your closet barn door genuinely reflects your personality and complements your home décor.
Choosing the Right Barn Door Style
The first step in designing your barn door is selecting a style that aligns with the ambiance of your home. Here are several popular styles to consider:
- Traditional Barn Door: Characterized by its classic, sturdy structure, this style often features a single panel with horizontal slats. It is perfect for those who appreciate rustic aesthetics.
- Modern Barn Door: Featuring clean lines and minimalist designs, modern barn doors are often made from sleek materials like glass or metal. This style suits contemporary homes beautifully.
- French Barn Door: This design includes multiple small windows, adding an element of elegance. French barn doors work well in spaces where light enhancement is desired.
- Glass Barn Door: A combination of wood frames and glass panels offers a sophisticated touch while allowing light to flow through the space.
- Sliding Barn Door: While this term refers more to the operation than the style, sliding barn doors are very versatile and can be made to resemble any aesthetic from rustic to modern.
Exploring Finishes for Your Barn Door
Once you’ve chosen a style, the next aspect to think about is the finish. The right finish can dramatically alter the look of your barn door.
- Natural Wood Finish: Showcasing the beauty of the wood grain, a natural finish (like varnish or stain) brings warmth and character to your door.
- Painted Finish: Choosing to paint your barn door opens up opportunities for creativity. Consider bold colors like navy blue or deep green for a striking appearance, or soft pastels for a more subtle look.
- Distressed Finish: A distressed look adds a weathered charm to your barn door, perfect for a farmhouse or rustic theme. Techniques include sanding or applying paints that reveal the wood beneath.
- Metal Finishes: If you’re going for a modern or industrial vibe, metallic finishes such as galvanized steel or brushed nickel may be the ideal choice.
- Two-Tone Finish: Mixing finishes can create a visually interesting effect. For example, a wood door with a painted frame can beautifully contrast while giving depth to your design.
Patterns and Textures to Enhance Aesthetic Appeal
Beyond color choices, the texture and pattern of your barn door can also elevate your closet’s overall look. Below are some popular patterns and textures you might explore:
- Chevron Patterns: a chevron pattern into your barn door design creates dynamic visual interest while remaining trendy and appealing.
- Shiplap Panels: Emulating a shipbuilding technique, shiplap can add depth and character with a rustic touch.
- Plywood Templates: This modern approach involves making geometric cutouts in plywood to create unique patterns that draw the eye.
- Reclaimed Wood Texture: For an eco-friendly option, using reclaimed wood not only tells a story but also adds varied textures to your barn door.
Completing Your Door’s Look with Hardware
The door’s hardware plays a crucial role in its overall style. Here are some hardware options to consider:
- Sliding Tracks: Opt for sturdy tracks that match the aesthetic of your door, whether rustic, modern, or industrial.
- Handles and Pulls: Choose handles that complement the door finish, from leather pulls for a vintage touch to sleek metal handles for a modern flair.
- Hinges: Decorative hinges can enhance the door’s appearance. Consider using oversized or uniquely styled hinges for added character.
By carefully selecting the design, finish, and hardware of your closet barn door, you can create a show-stopping feature that not only serves a functional purpose but also reflects your personal style. Take the time to explore various combinations, and don’t hesitate to draw inspiration from different styles to achieve a look uniquely yours.
Tips for Installing Your Barn Door Properly
Installing a barn door can be a fantastic way to add charm and functionality to your space. However, getting it right requires some careful planning and execution. Below are essential tips that will help you ensure your barn door is installed properly, enhancing its functionality and aesthetic appeal.
Choose the Right Location
The first step in your barn door installation is deciding where it will be located. Consider the following factors:
- Wall Space: Ensure you have adequate wall space beside the opening where the door will slide. Measure your opening and the door size to ensure it fits comfortably.
- Clearance: Make sure there is enough vertical clearance above the door for the hardware and the door to slide smoothly.
- Accessibility: Choose a location that is easy to open and close frequently, ensuring accessibility for everyone in your home.
Gather Your Tools and Materials
Before you dive into the installation, gather all the necessary tools and materials. Here’s what you’ll need:
- Barn door
- Sliding door hardware kit
- Drill and bits
- Level
- Stud finder
- Measuring tape
- Screwdriver
- Safety goggles
- Wood screws
Install the Header Board
The header board is crucial as it supports the sliding mechanism. Follow these steps:
- Use a stud finder to locate the studs in the wall where the barn door will be installed.
- Cut a piece of wood that is long enough to extend beyond the door’s width on both sides.
- Secure the header board to the studs using wood screws. Ensure it is level by checking with a level tool.
Attach the Roller Hardware
Once the header board is in place, it’s time to attach the roller hardware. This is how you can do it:
- Follow the manufacturer’s instructions for your specific hardware kit. This typically includes brackets that will be attached to the top of the door.
- Mark the positions for the roller hardware on the header board accurately. Ensure the marks line up with the dimensions of your door.
- Drill pilot holes and securely attach the hardware to the header board using the provided screws.
Hang the Door
Now comes the exciting part: hanging your barn door!
- With help from a friend, lift the door and align the rollers with the track on the header board.
- Carefully slide the door onto the track, ensuring it’s seated properly in place.
- Test the door by sliding it back and forth to ensure it moves smoothly.
Install the Door Stops and Anti-jump Mechanisms
Door stops prevent the door from sliding off the track, while anti-jump mechanisms ensure it stays securely in place. Here’s how to install them:
- Fix the door stops to the track at both ends, following the instructions provided with your hardware kit.
- If your hardware includes anti-jump mechanisms, install them according to the guidelines to keep the door from lifting off the track.
Finishing Touches
Now that your barn door is hung properly, it’s time to make it look great:
- Consider adding a handle or pull to the door for easier operation.
- If your door needs a finish or paint, do this before you install the hardware to avoid any mess.
Admire your hard work! Installing a barn door can truly transform a space, and you can be proud of having done it yourself. Follow these tips to ensure a sleek, secure installation that will stand the test of time. Remember, taking the time to plan and execute each step carefully will lead to a beautiful and functional addition to your home.
Maintenance and Care for Your Barn Door to Ensure Longevity
To keep your barn door looking great and functioning well, regular maintenance and care are essential. A barn door enhances the charm of your home, but it’s important to ensure its longevity through a few simple practices. Whether your barn door is made of wood, metal, or another material, understanding how to maintain it will preserve its beauty and functionality.
Regular Cleaning
One of the simplest ways to maintain your barn door is through regular cleaning. Dirt and dust can accumulate on the surface, affecting its appearance and overall condition. Here’s how to do it:
- Use a Soft Cloth: Wipe the door with a soft, damp cloth to remove any dirt or dust.
- Avoid Harsh Chemicals: Stay away from strong cleaning agents that can damage the finish or wood.
- For Stains: Use a gentle cleaner designed for the door’s specific material.
Inspect Hardware Regularly
The hardware on your barn door—hinges, tracks, and rollers—needs attention to ensure smooth operation. Here’s how to inspect your door hardware:
- Check for Rust: If your hardware is metal, look for signs of rust. If you find rust, clean it off and apply a rust-inhibiting spray.
- Tighten Screws: Periodically check that all screws and bolts are tightened. Loose hardware can lead to misalignment.
- Lubricate Moving Parts: Apply lubricant to the rollers and hinges to keep them moving smoothly.
Protect the Finish
Depending on the type of finish your barn door has, it may require specific protection:
- Stained or Painted Finishes: Every couple of years, consider refinishing the surface to maintain its appearance.
- Natural Wood: If your door is untreated wood, you can apply a clear finish or sealant to protect it from moisture.
- Keep Away from Direct Sunlight: UV rays can fade paint and stain over time, so consider using curtains or window films to protect the door.
Seasonal Care
The changing seasons can have an impact on your barn door. Here are some specific tips for maintaining the door year-round:
- Winter: Check for snow build-up on the track. Remove any ice or snow to prevent the door from sticking or becoming damaged.
- Spring: After the thaw, inspect for any water damage or mold. Wipe down the door to remove moisture and allow it to dry.
- Summer: If your barn door is exposed to high heat, ensure it isn’t warping by checking the alignment with the track and adjusting if necessary.
- Fall: Clean any fallen leaves or debris that could obstruct the door’s movement.
Repair Promptly
If you notice any damage such as scratches, chips, or dents, it’s best to address them quickly. Delay can lead to more significant issues. Here’s what to do:
- Small Scratches: Use wood fill for wooden doors, or touch-up paint for metal doors.
- Dents: If you have dented metal, you may be able to pop it out; otherwise, consider consulting a professional.
- Sealing Gaps: Ensure that any openings around the door are sealed to avoid drafts and moisture buildup.
By following these maintenance and care tips, you can ensure that your barn door remains a beautiful and functional part of your home for years. Regular attention will help preserve its charm and practicality, making it a statement piece rather than just a door. Remember, a little effort goes a long way in maintaining your barn door, allowing you to enjoy its unique style while keeping it in tip-top shape.
Conclusion
Building a barn door for your closet is not just a practical solution for saving space; it also adds a touch of rustic charm to your home. By following the step-by-step guide provided, you have the roadmap to create a stunning and functional piece. Remember, gathering the essential tools and materials upfront will streamline your project and enhance your confidence as you work.
Choosing the right design and finishes can truly transform your space. Whether you opt for a modern look or a classic wood finish, the options are plentiful, allowing you to personalize your closet door to match your home’s aesthetic seamlessly. As you move to the installation phase, make sure to take your time and use the tips shared to ensure a secure and level fit. Proper installation will not only enhance functionality but also allow your barn door to operate smoothly for years to come.
Regular maintenance is key to keeping your barn door looking fresh and functioning properly. A little care goes a long way—cleaning, tightening hardware, and applying finishes as needed can extend the life of your door. By dedicating time to both the building process and ongoing care, you will enjoy the beauty and practicality of your barn door for many years. Embrace your creativity in this rewarding DIY endeavor, and enjoy the transformation it brings to your living space.