Essential Features to Include in Your Blueprint DIY Nightstand Plans
When crafting your own nightstand, it’s essential to incorporate features that balance functionality and style. A well-thought-out design enhances your bedroom atmosphere while catering to your personal needs. Here are some crucial features to consider for your blueprint DIY nightstand plans.
Functionality
The primary purpose of a nightstand is to provide easy access to items you need at night. Consider the following functional elements:
- Storage Options: Include drawers and open shelves. Drawers can hold items like books and electronics, while open shelves are great for displaying decorative pieces.
- Surface Area: Ensure there’s enough space on top for a lamp, a clock, and any other essentials you use frequently.
- Power Outlets: Think about integrating electrical outlets for charging devices. This adds convenience without cluttering your space with cords.
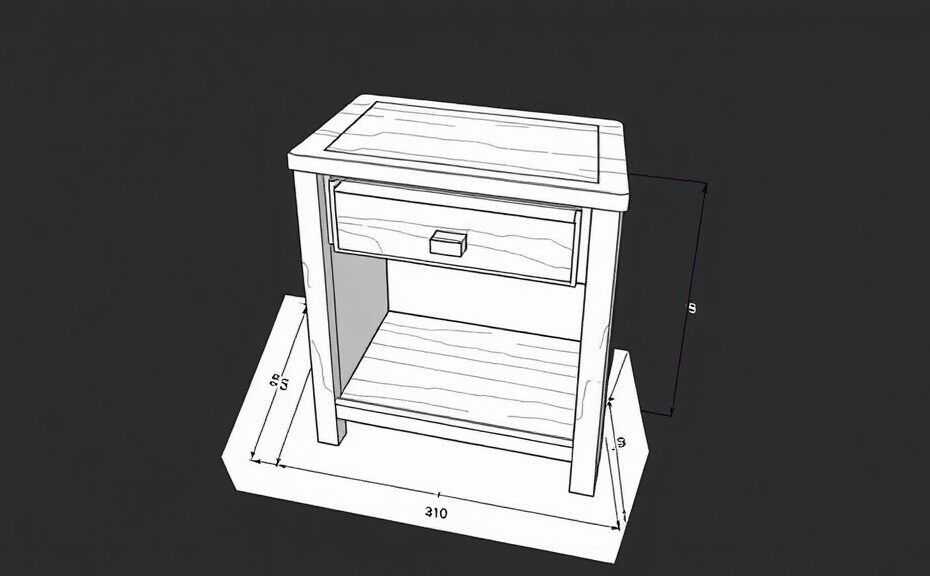
Size and Proportions
Understanding the dimensions of your nightstand is crucial. Here’s what to consider:
- Height: Make sure the top of the nightstand is at a comfortable height in relation to your bed. Ideally, it should be level with your mattress or slightly below.
- Width: Ensure that the width suits your space. A bulky nightstand in a small room can feel cramped, while a tiny one may not be sufficient for your needs.
- Depth: A depth of at least 14 to 18 inches can provide adequate space for storage and a comfortable surface area.
Style and Aesthetics
Your nightstand should complement your bedroom decor. Incorporate the following style elements into your plans:
- Material Selection: Choose materials that fit your overall design scheme. Solid wood offers durability, while metal can give a modern touch.
- Color Palette: Select colors that match or enhance your room’s aesthetic. Consider a stain or paint to make it uniquely yours.
- Hardware: Don’t overlook knobs and handles, as these small touches can elevate the overall look. Choose hardware that aligns with your style—rustic, sleek, or vintage.
Ease of Assembly
Building your nightstand should be enjoyable. To ensure this:
- Clear Instructions: Provide detailed steps in your blueprint to guide you through the construction process. Include diagrams to clarify complex assembly points.
- Pre-Cut Materials: Use pre-cut lumber or purchase a kit to simplify the build. This reduces both time and frustration.
- Tools Required: List all tools you’ll need upfront, so you have everything ready before starting the project.
Stability and Durability
A nightstand is a frequently used piece of furniture. To ensure yours lasts, consider these factors:
- Reinforced Corners: Use corner braces or dowels to strengthen joints, ensuring your nightstand remains sturdy over time.
- Leveling Feet: Include adjustable leveling feet in your plans, especially if your floor is uneven. This prevents wobbling and enhances usability.
- Surface Treatment: Apply a protective finish to prevent scratches and water damage. A sealant can extend its lifespan considerably.
Personal Touches
Make the nightstand your own!
- Customization: Personalize your design with unique features like a hidden compartment or integrated lighting.
- Decorative Elements: Think about adding embellishments such as carved patterns or painted designs that reflect your personality.
- Functionality Beyond Basics: Consider including a swivel tray for drinks or a pull-out tray for extra surface area during use.
By including these essential features in your blueprint DIY nightstand plans, you’ll create a piece of furniture that isn’t just beautiful, but also perfectly functional for your lifestyle. Remember, your nightstand serves as both a practical tool and a decorative element—make it uniquely yours!
Step-by-Step Guide to Building a Stylish Nightstand
Building your own nightstand can be a rewarding project that combines creativity and functionality. If you’ve decided to try your hand at crafting a stylish nightstand, this step-by-step guide will help you along the way. With just a few materials and tools, you can create a piece that not only looks great but also meets your storage needs perfectly.
Materials You’ll Need
- Wood boards (1-inch thick for the top and shelves)
- Wood screws (1.5 inches long)
- Wood glue
- Sandpaper (120 and 220 grit)
- Wood stain or paint
- Clear coat finish
- Drawer slides (if you plan to add drawers)
- Knobs or handles (for drawers)
Tools Required
- Power drill
- Saw (circular or miter saw)
- Measuring tape
- Square
- Pencil
- Clamps
- Screwdriver
Step 1: Design Your Nightstand
Before you start building, sketch your design. Consider how many shelves or drawers you want. A basic design consists of a square or rectangular top, legs, and a lower shelf or drawer area. Make sure to take measurements of your bedroom to ensure it fits well in the intended space.
Step 2: Cut Your Wood
Once you have your design ready, measure and cut your wood accordingly. Here’s a simple breakdown:
| Part | Dimensions |
|---|---|
| Top | 24″ x 18″ |
| Legs | 4 pieces at 24″ |
| Bottom Shelf | 22″ x 16″ |
Use a saw to make precise cuts, and remember to wear safety goggles.
Step 3: Assemble the Base
Start by attaching the legs to the bottom shelf. To do this effectively:
- Mark where the legs will be placed on the corners of the shelf.
- Use wood glue and screws to secure the legs.
- Ensure that everything is square using the measuring square.
Clamping the legs while the glue dries will provide a stronger bond.
Step 4: Attach the Top
Next, it’s time to add the top of your nightstand. Lay the upper piece on top of the legs and secure it thoroughly:
- Pre-drill holes in the top to avoid cracking.
- Attach the wood to the legs using screws, making sure that the top is level.
Step 5: Prepare for Finishing
Now, sand down any rough edges using both 120 and 220 grit sandpaper. This will create a smooth surface suitable for staining or painting. Remember to wipe away any dust before applying your stain or paint.
Step 6: Finishing Touches
Apply your chosen wood stain or paint using a brush or cloth. If you’re using stain, multiple coats will enhance the depth of color. Once dry, finish with a clear coat to protect the surface:
- Choose a polyurethane finish for a durable surface.
- Allow it to dry completely before moving on.
Step 7: Adding Drawers (Optional)
If you want drawers, install the drawer slides on the inside of the nightstand. Measure carefully, as incorrect placement will lead to misaligned drawers. Cut drawer fronts from remaining wood, and attach knobs or handles for an enhanced look.
Step 8: Enjoy Your New Nightstand
After everything has dried and set, place your nightstand in your bedroom and decorate it with your favorite books, a lamp, or other personal items. Enjoy the satisfaction of using a stylish nightstand that you crafted with your own two hands!
Common Mistakes to Avoid When Crafting DIY Nightstands
Crafting your DIY nightstand can be an exciting journey, but it’s easy to make mistakes that can lead to frustration. Understanding what to steer clear of can make the process smoother and ensure your finished piece not only looks great but also functions well. Below are some common pitfalls to avoid when diving into your DIY nightstand project.
Choosing the Wrong Materials
Selecting the right materials is crucial for the quality and longevity of your nightstand. Here are some frequently overlooked aspects:
- Incompatible Wood Types: Different woods have varying properties. Softwoods like pine might be easy to work with, but they can dent and scratch easily. Hardwoods like oak or maple are more durable.
- Incomplete Material List: Not having all your materials before starting can slow you down. Always create a comprehensive list and check it twice.
- Ignoring Weight Capacity: If you plan on placing items like books or lamps, make sure the materials you select can support the weight.
Inaccurate Measurements
One of the most frustrating issues in DIY projects is faulty measurements. To avoid this, focus on the following strategies:
- Double-Check Before Cutting: Always measure twice, cut once.
- Use Standard Tools: A tape measure is ideal, but consider using a carpenter’s square for ensuring corners and edges are straight.
- Account for Thickness: Remember that the thickness of your wood can affect your measurements.
Lack of Planning
Jumping into a project without a clear plan can lead to confusion and wasted materials. Here’s how to plan efficiently:
- Sketch it Out: Create a clear design sketch that includes all dimensions.
- Build a Prototype: Use cheaper materials or cardboard to create a mock-up. This can help you visualize size and layout.
- Flow of Assembly: Consider the sequence in which you will build your nightstand to ensure you don’t miss essential steps.
Neglecting Safety Precautions
Safety should always be a top priority when working with tools and materials. Implement these tips:
- Wear Proper Safety Gear: Safety goggles, gloves, and a dust mask should always be used.
- Check Tools Before Use: Ensure that your tools are in good condition. Dull blades can be more dangerous.
- Work in a Safe Environment: Clear your workspace of clutter to prevent accidents.
Skipping the Finish
Finishing your nightstand is critical for both aesthetics and protection. Here’s what to keep in mind:
- Choose the Right Finish: Whether it’s paint, stain, or sealant, select an appropriate finish to enhance the wood grain and protect it from wear.
- Test Your Finish: Before applying it broadly, test your chosen finish on a small, inconspicuous area.
- Apply Multiple Coats: One coat may not suffice. Consider applying multiple layers for durability.
Overcomplicating Design
Sometimes, DIY enthusiasts tend to overthink their designs, leading to unnecessary complications. To keep it simple:
- Stick to Straight Lines: Geometric shapes are easier to cut and assemble than complex curves.
- Limit the Features: While drawers and compartments are appealing, they can complicate assembly. Start with a simple nightstand and add features later as your skills improve.
Ignoring Functionality
Functionality is paramount; your nightstand should serve its purpose. Here are some features to consider:
- Adequate Storage: Ensure there’s enough space for your essentials, like books, alarm clocks, and lamps.
- Height Accessibility: Pay attention to the height of the nightstand. It should be level with your mattress for easy access.
- Cable Management: If you plan to place lamps or chargers on your nightstand, consider adding holes for cords to maintain a clean look.
Rushing the Process
It can be tempting to quickly finish a project and move on to the next, but rushing can lead to mistakes. Here’s how to pace yourself:
- Set Realistic Timelines: Give yourself plenty of time to complete each step without pressure.
- Take Breaks: Allow yourself to step away briefly if you feel frustrated.
- Evaluate Regularly: Periodically check your progress against your plan to make adjustments as needed.
By avoiding these common mistakes, you can create a beautiful and functional DIY nightstand that you can be proud of. Remember that patience and attention to detail will go a long way in making your project a success. Happy building!
Choosing the Right Materials for Your Nightstand Project
Choosing the right materials for your DIY nightstand project can significantly impact the finished product’s durability, style, and functionality. Whether you’re a novice or an experienced woodworker, understanding the different materials available is crucial for a successful build. Here, we break down various material options, their benefits, and factors to consider, ensuring you make an informed decision for your nightstand.
Wood Types
Wood is a popular choice for nightstands due to its beauty and versatility. Here are some common wood types to consider:
- Softwood:
- Pine: Affordable and easy to work with. Ideal for beginners.
- Cedar: Naturally resistant to decay, making it a great choice for long-lasting furniture.
- Hardwood:
- Oak: Known for its strength and durability. Offers a classic look.
- Maple: Hard and resistant to scratches and dents, perfect for a polished finish.
- Walnut: Rich in color and grain, providing an upscale appearance but can be more expensive.
When selecting wood, think about your budget, the tools you have available, and the final look you want to achieve.
Particleboard and MDF
For a more cost-effective option, consider particleboard (PB) and medium-density fiberboard (MDF).
| Material | Pros | Cons |
|---|---|---|
| Particleboard | Inexpensive, lightweight | Less durable than solid wood |
| MDF | Smooth surface, easy to paint | Can sag over time, especially under heavy weight |
Both options can be great for nightstands, particularly if you plan to paint or laminate them.
Finishing Materials
Once you’ve chosen your primary material, you’ll want to think about how to finish it. The finish can protect your nightstand and enhance its aesthetic. Here are some common finishes:
- Stain: Adds color while allowing the wood grain to show through.
- Paint: Provides a solid color option; great for customization.
- Varnish: Offers a hard, glossy finish that protects against scratches and moisture.
When selecting a finish, think about how the nightstand will be used. If it will hold drinks or be in a humid space, a water-resistant varnish may be necessary.
Hardware Selection
The right hardware is essential for both functionality and style. Here are the common hardware components you may need:
- Drawer Slides: Choose between side-mounted or bottom-mounted slides for smooth operation.
- Handles and Knobs: Available in various materials and styles, choose ones that complement your overall design.
- Screws and Fasteners: Select high-quality screws to ensure durability and stability.
Don’t overlook the hardware, as it can make your nightstand not only practical but also stylish.
Consider Your Style and Needs
Before finalizing your choices, think about the purpose of your nightstand.
- Will you need extra storage space?
- Do you prefer a minimalist design or something more ornate?
- How will the nightstand fit with your existing decor?
Analyzing these factors can guide you in making choices that align with your lifestyle and personal taste.
Building your nightstand can be a rewarding project when you carefully consider the materials you use. Choosing the right wood or alternative materials, selecting appropriate finishes, and hardware that complements your design are all critical steps in creating a beautiful and functional piece of furniture. Through thoughtful planning and material selection, you’ll be well on your way to crafting the perfect nightstand that fits your home and meets your needs. Happy building!
Creative Designs for Customizable Nightstands to Suit Any Room
When it comes to enhancing your living space, one of the best spots to start is with your nightstands. Creative designs for customizable nightstands can turn a functional piece of furniture into a standout element in any room. With the right ideas and a little effort, you can craft a unique nightstand that reflects your personal taste and complements your decor.
One of the joys of DIY projects is that you can tailor each piece to your needs. Choosing the right materials is crucial, as it can affect not just aesthetics but the overall durability of your nightstand. Here are some popular materials you can consider:
- Wood: Offers warmth and character. Whether you pick oak, pine, or cedar, it can add a rustic or modern touch depending on how you finish it.
- Metal: Provides a sleek, industrial look. You can explore options like steel or aluminum for a minimalist feel.
- Composite Materials: These are often budget-friendly and can mimic the aesthetics of wood or metal. Ideal for creative designs.
Once you select your material, you can explore various design concepts. Here are a few creative ideas tailored for customizable nightstands:
- Floating Nightstands: These give your room an airy feel. By mounting them to the wall, you save space and create the illusion of a larger room.
- Stacked Boxes: Use various sizes of boxes in different colors for a playful, eclectic look. This design allows you to adjust the height and storage according to your needs.
- Repurposed Furniture: Old furniture, such as a small chest of drawers, can be transformed into a charming nightstand. A good coat of paint or new hardware can do wonders.
- Corner Nightstands: Making use of corner spaces can maximize your room’s layout. A triangular design can fit snugly, providing functionality where traditional stands might not.
- Multi-Functional Designs: Think of incorporating additional features like shelving, drawers, or even a small desk. This maximizes utility while adding personal flair.
Next, let’s consider the finishing touches that can elevate your nightstand even more. Customization can come in various forms. Here’s a list to inspire you:
- Paint and Stain: Distressing wood can give an antique feel, while bold paint colors can turn your nightstand into a statement piece.
- Hardware: Unique knobs and handles can personalize your designs. Consider vintage options or modern designs based on your preferred style.
- Lighting: Incorporate small clip-on lamps or decorative lights to enhance functionality and ambiance.
- Textiles: Adding textured materials like a colorful runner or decorative tray can offer additional layers of visual interest.
Selecting the right color palette is also essential. When choosing colors, think about how they will complement your existing decor. Here are a few combinations you might consider:
| Room Style | Complementary Colors |
|---|---|
| Modern | White, Grey, Black |
| Rustic | Brown, Deep Green, Cream |
| Eclectic | Bold Colors like Turquoise, Yellow, and Magenta |
| Scandinavian | Pale Blue, Soft Pink, Light Wood |
When you embark on creating your nightstand, remember that it doesn’t have to be perfect; the beauty lies in personal expression. Don’t shy away from experimenting. Each project helps you refine your skills and develop your own style over time.
Designing customizable nightstands can be fulfilling and enjoyable. They can range from simple to intricate, depending on your skills and ambition. By thinking creatively and utilizing materials that speak to you, you can create a functional yet stylish addition to your room. This not only enhances the overall decor but also makes your personal space truly feel like home.
Key Takeaway:
When embarking on a DIY nightstand project, understanding key features and strategies can significantly enhance your outcome, making your nightstand not only functional but also a stylish addition to your space. Here’s a comprehensive takeaway from the essential topics explored in the article.
First and foremost, when laying down your Blueprint DIY Nightstand Plans, consider integrating essential features that enhance usability. This includes a sturdy top surface for lamps and books, multiple storage options like drawers or shelves, and stylish but functional hardware. A well-thought-out design paves the way for a successful build, ensuring that your nightstand fits your lifestyle.
Next, a Step-by-Step Guide to Building a Stylish Nightstand is crucial for DIY enthusiasts at any skill level. Begin with clear dimensions and a user-friendly blueprint to follow. Measure your space accurately and cut materials precisely. Assembly follows a systematic approach—begin with the framework before attaching the surfaces and finishing touches. Adhering to this guide can prevent unnecessary errors and time loss.
However, even the best plans can falter due to Common Mistakes to Avoid When Crafting DIY Nightstands. A frequent misstep is negligence in measuring, leading to pieces that don’t fit together well. Additionally, failing to sand down surfaces before applying stain or paint can dull the appearance of your final product. Always take your time during the building process and continuously reassess your work at each stage.
Choosing the Right Materials for Your Nightstand Project is another integral aspect to consider. Solid wood offers durability and a classic aesthetic, while plywood can be cost-effective and still visually appealing when done right. Comprehending the strengths and weaknesses of various materials will guide you towards making choices that elevate your nightstand’s quality.
Explore Creative Designs for Customizable Nightstands to Suit Any Room. Whether you prefer a minimalist style or something more eclectic, personalization can make your nightstand truly unique. Adjust dimensions, colors, and hardware to match your room’s decor. This adaptability not only enhances the appeal of your DIY project but gives it a personal touch that reflects your style.
In essence, a successful DIY nightstand requires thoughtful planning, careful execution, and a touch of creativity. With these takeaways, you are well on your way to crafting a nightstand that meets your needs and showcases your personal design flair. Happy building!
Conclusion
Creating your own nightstand can be both a rewarding and practical project. By focusing on essential features, you can ensure your DIY nightstand is not only functional but also stylish. Remember to include elements such as ample storage, a suitable height, and a stable structure in your blueprint DIY nightstand plans.
Following a step-by-step guide can streamline the building process, making it easier for you to achieve a professional look. Take your time, and don’t rush through each stage. This method will help you avoid common mistakes that many first-time builders face, such as miscalculating dimensions or selecting inappropriate materials.
Choosing the right materials is crucial for durability and aesthetics. Look for quality wood or other finishes that resonate with your home’s decor. The right selection will not only enhance the look of your nightstand but also stand the test of time.
Think creatively when designing your nightstand. Customizable features allow you to tailor the piece to fit any room style, from modern to rustic. Combining your personal taste with functional requirements can yield a unique nightstand that truly reflects your style.
This project invites you to unleash your creativity and build a piece that’s uniquely yours. Each effort you put into crafting your nightstand will contribute to a cozy, personalized bedroom environment. So gather your tools, choose your designs wisely, and enjoy the process of creating a nightstand that is both beautiful and functional.