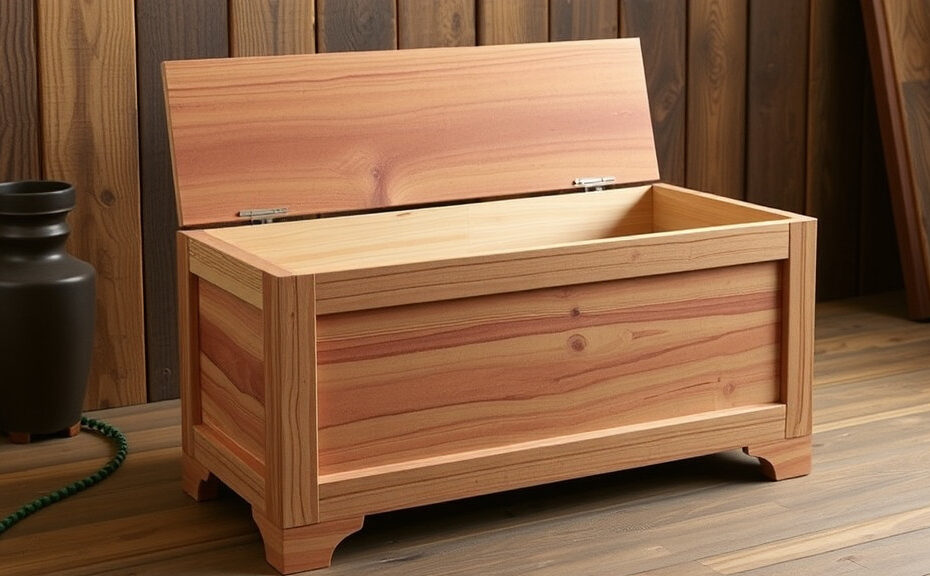
Effective Cedar Chest Plans for Home Storage Solutions
When you think about organizing your home, a cedar chest might not be the first item that comes to mind. However, effective cedar chest plans can transform this classic piece of furniture into a valuable storage solution that provides both utility and style. Cedar chests are not only beautiful but also functional. They offer an excellent way to store linens, blankets, and seasonal clothing while keeping them safe from pests and moisture.
A cedar chest’s natural properties make it a top choice for preserving stored items. The aroma of cedar can keep moths and other insects at bay, making it ideal for storing delicate fabrics. As you consider how to implement cedar chest plans into your home, here are some effective strategies to guide you.
Choosing the Right Design
When selecting your cedar chest plans, choose a design that suits your needs and space. Here are a few popular designs:
- Traditional Hope Chest: A common choice, this design typically features a hinged lid and is deep enough to hold ample items.
- Storage Bench: A dual-purpose design that provides seating while offering a place to store items inside.
- Custom Shapes: Depending on your space, you might prefer a low-profile design or a more artistic, contemporary shape.
Materials Needed
Your cedar chest plans will require quality materials to ensure durability. Here’s a simple checklist of essential materials:
- Cedar lumber boards
- Wood screws
- Wood glue
- Sandpaper
- Wood finish or sealant
- Hinges and handles if required
Step-By-Step Guidelines
Once you have your plans and materials ready, it’s time to start building. Follow these steps for effective results:
- Measure and Cut: Use a saw to cut your cedar boards according to your design. Be precise to ensure all pieces fit together nicely.
- Assemble the Base: Start by creating the chest’s base. Use wood screws and glue to connect the side panels to the base piece.
- Add the Top: Attach the top panel, ensuring it fits securely and opens smoothly. You can use hinges for this.
- Sand and Finish: Once assembled, sand down any rough edges to create a smooth surface. Apply a wood finish or sealant to enhance the wood’s natural beauty and durability.
Storage Tips for Your Cedar Chest
After constructing your cedar chest, how can you maximize its storage potential? Consider these tips:
- Organize by Category: Group similar items together to make it easier to find what you need.
- Use Protective Covers: For delicate items, consider using breathable fabric bags to add an extra layer of protection.
- Avoid Overpacking: While it may be tempting to stuff it full, overpacking can damage the structural integrity of the chest.
Maintenance and Care
To keep your cedar chest in prime condition, regular maintenance is essential. Here are some maintenance tips:
- Keep It Dry: Ensure your chest is kept in a dry area to prevent moisture build-up.
- Check for Pests: Inspect your chest periodically for signs of pests and treat as necessary.
- Reapply Finish: Over time, the finish may wear off. Reapply wood finish every few years to protect the wood.
| Item | Benefits |
|---|---|
| Cedar Wood | Naturally repels pests, aromatic, and aesthetically appealing. |
| Sealed Finish | Protects the wood from moisture and damage. |
| Dividers | Helps organize items and keeps them separated. |
Implementing these effective cedar chest plans can help you achieve a combination of beauty and functionality in your home storage solutions. With the right plan, materials, and care, your cedar chest will not only serve practical purposes but also enhance your living space’s overall aesthetic. It’s a charming addition that can bring warmth and history into your home while providing necessary organization.
Selecting the Right Cedar Wood for Your Chest Project
Creating a cedar chest can be a rewarding woodworking project. One of the most important decisions you will make is selecting the right cedar wood for your chest. The quality of the wood can greatly affect the durability, appearance, and overall success of your project. Below are key considerations to help you choose the best cedar for your needs.
Understanding Cedar Types
There are different types of cedar wood available, each with its unique characteristics. The two most commonly used varieties for chest projects are:
- Western Red Cedar: Known for its rich color and pleasant aroma, Western Red Cedar is lightweight and resistant to decay. It’s an excellent choice for indoor projects.
- Eastern Cedar (also known as Aromatic Cedar): This type is denser and has a stronger scent, making it a popular choice for adding aroma to stored items and protecting them from moths.
Factors to Consider When Choosing Cedar
When selecting cedar wood for your project, consider the following factors:
- Grain Pattern: Look for wood with a straight, uniform grain, as it makes cutting and assembling easier.
- Color: Choose a tone that fits your aesthetic. Cedar ranges from light yellow to deep reddish-brown.
- Thickness: Thicker boards offer more durability. Look for boards that are at least 3/4 inch thick for your chest.
- Aroma: Consider how strong you want the cedar scent to be. Eastern Cedar is more fragrant than Western Red Cedar.
- Cost: Cedar wood can be pricey, especially for high-quality varieties. Plan your budget accordingly.
Where to Source Your Cedar
Finding good-quality cedar is essential. Here are some options:
- Local Lumber Yards: Often have a variety of cedar types and grades. You can inspect the wood before purchasing.
- Home Improvement Stores: They typically carry cedar in various lengths and thicknesses, but quality can vary.
- Online Suppliers: Websites specializing in lumber can provide a broader selection, often allowing you to compare prices and quality.
Cedar Grades Explained
Cedar wood comes in different grades, which affects its appearance and price. Here’s a simple breakdown:
| Grade | Features |
|---|---|
| Clear Grade | No knots or blemishes; ideal for a polished look. |
| Select Grade | Some knots, but overall good quality; cost-effective for projects. |
| Common Grade | More knots and imperfections; suitable for rustic designs. |
Preparing Cedar for Your Project
Once you select the right cedar, proper preparation is key:
- Drying: Ensure the cedar is kiln-dried to prevent warping and cracking in the future.
- Sanding: Smooth edges and surfaces to avoid splintering, which can be crucial for the safety of users.
- Finishing: Apply a sealant or finish to protect the wood from moisture and wear. This is particularly important for outdoor cedar chests.
Final Thoughts
Selecting the right cedar wood for your chest project requires careful consideration of type, quality, and preparation. By understanding the characteristics of different cedar types and what to look for, you can ensure your cedar chest not only looks beautiful but also lasts for years. Armed with this knowledge, you’re now ready to dive into creating your cedar chest with confidence.
Essential Tools and Materials for Building a Cedar Chest
Building a cedar chest can be a rewarding project that combines functionality with a touch of craftsmanship. To get started, it’s essential to gather the right tools and materials. By ensuring you have everything in place before you begin, you can make the process smoother and more enjoyable. Below, you’ll find a comprehensive overview of the essential tools and materials needed for this delightful woodworking endeavor.
Essential Tools for Building a Cedar Chest
Having the right tools is crucial for any woodworking project. Here’s a list to help you prepare:
- Measuring Tape: Accurate measurements are key to successful woodworking.
- Square: A carpenter’s square will ensure your angles are precise, helping to maintain a square shape.
- Saw: A circular saw or table saw will be necessary for cutting cedar boards to size.
- Chisel: Use chisels for finer detail, especially when creating joints.
- Drill: A cordless drill is great for making holes and driving screws.
- Screws and Fasteners: Choose stainless steel or brass screws for durability; these materials resist rust and corrosion.
- Sander: An orbital or belt sander will help you achieve a smooth finish on your cedar chest.
- Paintbrush or Roller: If you plan to finish or stain your cedar chest, these will come in handy.
Core Materials Needed
Now that you have your tools ready, it’s essential to gather the right materials. Cedar wood is the star of this project, known for its natural fragrance, resistance to decay, and beautiful grain.
- Cedar Boards: Aim to source high-quality cedar. Select boards that are at least 1-inch thick for sturdiness. Here’s a suggested wood list:
| Wood Type | Size (inches) | Quantity |
|---|---|---|
| Cedar Panels | 1 x 6 | 4-6 |
| Cedar Plywood | 1/2 x 4 x 8 | 1 |
| Cedar Trim | 1 x 3 | 3-4 |
When choosing váš cedar boards, look for pieces that are straight and free from knots or cracks. This will make for a more aesthetically pleasing wooden chest.
Finishing Materials
To protect the wood and bring out the natural beauty of cedar, consider the following finishing materials:
- Wood Stain: Select a stain that enhances the cedar color. Test it on a small piece first.
- Wood Finish: A clear varnish or polyurethane will protect your chest from scratches and moisture.
- Sandpaper: Stock up on various grits (80, 120, and 220) for the sanding process to ensure a smooth finish.
Miscellaneous Tools and Materials
Besides the main tools and materials, don’t forget these essential items that you may need:
- Clamps: These are essential for holding pieces together while the glue dries.
- Wood Glue: This will provide added strength to joints.
- Safety Gear: Safety glasses and a dust mask are crucial to protect yourself while working.
Planning and Preparation
Before you start building, take the time to sketch your design and plan your project thoroughly. Having a clear vision will guide you through each step. Understanding the steps will also help you determine if you need any additional materials or tools based on your unique design.
By gathering the essential tools and materials outlined above, you set the stage for a successful cedar chest building experience. This chest will not only be a beautiful addition to your home but also a testament to your woodworking skills.
Creative Ideas for Decorating and Personalizing Cedar Chests
Cedar chests are not just functional pieces of furniture; they also offer an excellent opportunity for you to showcase your creativity. By decorating and personalizing your cedar chest, you can turn a simple storage box into a beautiful focal point in your home. Below are a variety of creative ideas to inspire you in transforming your cedar chest into a one-of-a-kind treasure.
1. Paint and Stain Techniques
One of the simplest ways to personalize your cedar chest is through paint and stain. Here are some techniques to consider:
- Stenciling: Use stencils with patterns or designs that resonate with your style. Whether it’s floral, geometric, or whimsical, stenciling can add a sophisticated touch.
- Color Blocking: Choose complementary colors and divide the chest into sections to paint differently. This trendy approach creates a modern look that stands out.
- Distressing: For a vintage feel, gently sand the edges after painting or staining. This technique gives your chest an antique, rustic appearance.
2. Decoupage for a Unique Look
Decoupage is a fun technique that involves gluing decorative paper, fabric, or other materials onto your cedar chest. Here’s how to implement this idea:
- Choose Your Material: Select papers or fabrics that reflect your personality—perhaps vintage maps, scrapbooking paper, or family photos.
- Prep the Surface: Clean the chest front thoroughly and apply a primer if necessary to ensure a good bond.
- Seal the Design: After applying your chosen material, cover it with a protective sealant. This ensures durability and adds a glossy finish.
3. Using Natural Elements
If you prefer a more organic look, consider incorporating natural elements into your cedar chest design:
- Wood Burned Designs: Use a wood burning tool to etch custom designs or meaningful words onto the surface of your chest.
- Dried Flowers: Glue dried flowers around the edges or on the lid to create a beautiful, nature-inspired masterpiece.
- Carving: If you have the skills, consider carving patterns or initials into the wood for a personal touch.
4. Adding Fabric Elements
Fabric can bring texture and warmth to your cedar chest. Here are some ways to incorporate fabric:
- Cushioned Lid: Add a soft cushion on top of the chest for added comfort. Use fabric that complements the room’s theme.
- Lining the Inside: Line the interior with soft fabric. This not only protects your belongings but also adds a touch of elegance.
- Banner or Flag: Create a small fabric banner or flag to hang on the chest, personalizing it with your family name or a fun slogan.
5. Decorative Hardware
Never underestimate the impact of decorative hardware. Changing the knobs and handles can completely transform the look of your cedar chest:
- Colorful Knobs: Opt for colorful and unique knob styles that pop against the wood finish.
- Vintage Handles: Searching antique shops for retro handles can give your cedar chest a unique appeal.
- Personalized Plaques: Add a nameplate or plaque engraved with a special date or name, positioning it on the front of the chest.
6. Themed Decor Ideas
Consider personalizing your cedar chest based on a theme that reflects your interests or memories:
- Travel Memories: Decorate with travel-inspired designs or photos from your favorite destinations.
- Family Heritage: Use family motifs, such as crests or colors that represent your family’s heritage.
- Seasonal Themes: Change decorations seasonally to reflect holidays or times of the year, such as autumn leaves or winter snowflakes.
Ultimately, the decoration of your cedar chest can embody your creativity and style, making the piece truly yours. Remember, personalization is not just about aesthetics; it’s about creating a connection to your home and memories. Whether you choose paint, fabric, or natural elements, your cedar chest will surely become a cherished part of your space.
Maintenance Tips for Preserving the Longevity of Cedar Chests
Cedar chests are not just beautiful pieces of furniture; they also hold sentimental value and serve practical purposes in storage. To ensure your cedar chest lasts for generations, regular maintenance is essential. Here are some valuable tips to preserve the longevity of your cedar chest.
1. Keep it Clean
Cleaning your cedar chest should be a routine task. Dust and dirt can accumulate and affect the finish and the scent of cedar. Here’s how to clean it properly:
- Use a soft cloth or a microfiber cloth to gently wipe the exterior and interior of the chest.
- Avoid using strong chemicals or abrasive cleaners, as they can damage the wood.
- For tough stains, a mixture of mild soap and water can be used lightly.
2. Control Humidity Levels
Cedar wood is naturally resistant to moisture; however, extreme humidity can lead to damage. Follow these guidelines to maintain optimal humidity:
- Store your cedar chest in a climate-controlled environment. The ideal humidity level is between 40-60%.
- Use a dehumidifier in humid conditions or air conditioning during the summer months.
- Ensure that your chest is not placed directly against a wall, as this can trap moisture.
3. Use Essential Oils for Freshness
Cedar has a pleasant aroma, but over time, this scent can diminish. To keep your cedar chest smelling fresh:
- Apply cedarwood essential oil on a cotton ball and place it inside the chest.
- Replace the cotton ball every few months to ensure a consistent fragrance.
- Consider adding lavender or other essential oils that complement cedar’s scent.
4. Inspect Regularly for Damage
Frequent inspections can help identify potential issues before they become serious problems. Here are some things to look out for:
- Check for cracks or splits in the wood, which can occur due to changes in temperature or humidity.
- Look for signs of pests, such as wood-boring insects, which can compromise the structure of the chest.
- Monitor the hinges and locks for rust or corrosion, which can impede functionality.
5. Refinish When Necessary
Over time, the finish on your cedar chest may wear down, which could lead to problems. Refinishing helps restore its beauty and protect the wood:
- If the chest’s finish appears dull or scratched, sand it lightly with fine-grit sandpaper.
- Apply a quality wood finish, oil, or lacquer to provide protection.
- Be sure to follow the manufacturer’s instructions for the specific products used.
6. Avoid Excessive Weight
Loading your cedar chest with heavy items can strain the hinges and warp the structure. To prevent damage:
- Be mindful of the weight of the items stored inside.
- Organize the items to distribute weight evenly.
- Consider using storage bins or smaller containers for heavier items.
7. Choose the Right Location
A well-chosen location for your cedar chest can enhance its longevity. Keep these factors in mind:
- Avoid placing the chest in direct sunlight, as UV rays can fade and damage wood finishes.
- Keep it away from heating vents and radiators that can cause extreme fluctuations in temperature.
- Consider an area with good airflow to prevent moisture buildup in and around the chest.
8. Store Appropriate Items
The types of items you choose to store in your cedar chest can impact its health. Follow these guidelines:
- Avoid storing food items, as they can attract pests.
- Wrap delicate fabrics in acid-free tissue to protect them from cedar’s natural oils.
- Keep chemical-based items, like cleaning supplies, out of the chest.
These maintenance tips for your cedar chest will help ensure it remains a cherished item in your home for many years to come. By treating it with care and respect, you preserve not only its beauty but also its functionality and sentimental value.
Key Takeaway:
When it comes to creating effective cedar chest plans for home storage solutions, it’s essential to consider a few key aspects to ensure your project is both fulfilling and functional. Firstly, selecting the right type of cedar wood can significantly influence the quality and durability of your finished chest. Western Red Cedar is one of the most popular choices due to its natural resistance to decay, beautiful grain, and pleasant aroma. It’s crucial to choose wood that is free of knots and defects for the best results.
Next, gathering the essential tools and materials before beginning your project will save you time and stress. A circular saw, measuring tape, wood glue, sandpaper, and hinges are just a few of the key items you’ll need. Having everything at hand will make your building process smoother and more enjoyable.
Once your cedar chest is built, you might want to explore creative ideas for decorating and personalizing it. Consider stenciling, woodburning, or using varnish to add your unique touch. Personalization not only enhances the aesthetic but also makes the chest a memorable piece that reflects your style or family history.
Maintaining the longevity of your cedar chest is essential to keep it looking beautiful and functioning well for years to come. Regular dusting and occasional reapplication of cedar oil will help maintain its fresh scent and protect the wood from wear and tear. Also, keeping the chest in a dry environment will prevent moisture damage.
Effective cedar chest plans incorporate the right materials, tools, and personal touches while ensuring easy maintenance. By following these guidelines, you can create a wooden chest that not only serves as a practical storage solution but also enhances your home decor and holds sentimental value for generations to come.
Conclusion
Building a cedar chest is a rewarding project that adds both beauty and functionality to your home. With effective cedar chest plans in hand, you can create a storage solution that perfectly fits your needs. Remember, selecting the right type of cedar wood is crucial; opt for high-quality cedar to ensure durability and that delightful aroma we all associate with cedar chests.
Equipping yourself with essential tools and materials will make your crafting process smoother and more enjoyable. A well-prepared workspace, complete with the right supplies, allows you to focus on bringing your vision to life. Don’t forget to express your creativity – personalizing your cedar chest with decorative touches can make a simple project feel like a family heirloom.
Once you’ve constructed your chest, maintaining it becomes a vital part of ensuring its longevity. Regular cleaning and conditioning will keep the wood looking fresh and fragrant while protecting it from wear and tear.
Whether you use your cedar chest for storing clothing, linens, or sentimental keepsakes, it’s sure to become a cherished piece in your home. The skills and decisions you make during this project will not only provide you with practical storage but also create a timeless piece that can be passed down through generations. Embrace the journey of building your cedar chest, and enjoy the satisfaction it brings to your home.