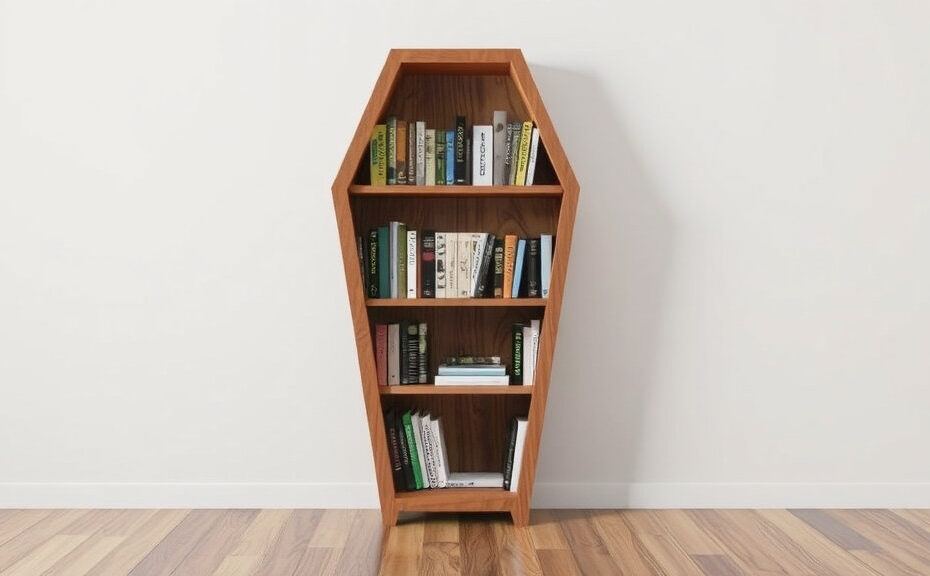
Creative Coffin Bookshelf Plans for Unique Home Decor
Are you looking to add a spooky touch to your home décor? Coffin bookshelves offer a unique, eye-catching way to display your books while making a bold statement. These creative pieces not only serve a functional purpose but also act as conversation starters. Whether you’re a fan of gothic design, Halloween aesthetics, or simply want something different, coffin bookshelf plans can help you craft the perfect addition to your space.
Crafting Your Coffin Bookshelf
Building your custom coffin bookshelf may seem like a daunting task, but with the right plans, tools, and materials, you can create a stunning piece that reflects your style. Below, you’ll find a list of essential materials and tools you will need:
- Materials:
- Wood (plywood, MDF, or solid wood)
- Wood screws
- Wood glue
- Sandpaper
- Wood finish or paint
- Optional decorations (e.g., skulls, cobwebs)
- Tools:
- Measuring tape
- Circular saw or jigsaw
- Screwdriver
- Drill
- Paintbrushes
Step-by-Step Plan
Creating a coffin bookshelf involves a series of simple steps. Follow this outline to guide your construction:
- Design Your Bookshelf: Sketch a design that outlines the dimensions and features of your coffin bookshelf. Ensure you include space for each shelf and consider how many books you want to store.
- Cut the Wood: Use your saw to cut the wood according to your design dimensions. You will need pieces for the top, bottom, sides, back, and shelves.
- Assemble the Coffin: Start by attaching the sides to the base using screws and glue. Then, add the back panel for stability. Don’t forget to add internal shelves based on your plan.
- Sand and Finish: Once assembled, sand the edges and surfaces to ensure a smooth finish. Apply paint or wood stain to match your home decor and personal taste.
- Add Details: Consider customizing your bookshelf with decorative elements like a cross or ornate carvings. You can also add lighting to enhance the spooky atmosphere.
Placement Ideas
After completing your coffin bookshelf, the next step is choosing the perfect location. Here are some great placement suggestions to showcase your new creation:
- Living Room: Use it as a focal point in your living room, filled with your favorite novels or decorative items.
- Home Office: Add a unique twist to your workspace by incorporating diverse books related to your profession or hobby.
- Halloween Display: Perfect for the spooky season, place it among other themed decorations for a hauntingly delightful look.
- Bedroom: Use it as a quirky nightstand or place it in a corner to create a cozy reading nook.
Styling Your Coffin Bookshelf
Styling your coffin bookshelf can elevate its charm while making it even more of a centerpiece. Here are some creative ideas:
- Contrast Elements: Pair darker wood tones with lighter accents or colorful books to create an eye-catching contrast.
- Interspersed Decor: Include plants, skull decorations, or candles to enhance the gothic aesthetic.
- Theming: Base your styling on a theme, like classic horror, fantasy, or novels of your choice. This can guide your book selection and decoration choices.
By following these creative coffin bookshelf plans, you can easily build a distinctive storage solution that reflects your personality. Not only is it practical, but it will also provide a unique flair to your home decor that’s sure to impress your guests!
The Benefits of Custom-DIY Bookshelves
Creating your own custom-DIY bookshelves can bring numerous benefits that enhance both your living space and your reading experience. Not only do they serve a functional purpose, but they also allow you to express your creativity and personal style. Let’s explore a range of advantages that come with building your own bookshelves.
Personalization
One of the greatest benefits of custom-DIY bookshelves is the level of personalization they offer. You can design a bookshelf that perfectly fits the dimensions of your available space. This could be a snug fit in a corner or a floating shelf above your desk. Custom shelves can also reflect your personality through their design, color, and the types of materials you choose. By selecting what resonates with you, these shelves become more than just storage; they become a part of your home’s aesthetic.
Cost-Efficiency
When comparing the cost of ready-made bookshelves with custom-built ones, you may find significant savings. The materials you choose often dictate the total expense. By sourcing wood from local suppliers or repurposing old furniture, you can create beautiful bookshelves without breaking the bank. Furthermore, you avoid marked-up prices typically associated with store-bought furniture.
Flexible Design Options
With custom-DIY bookshelves, the design possibilities are virtually endless. Here are just a few options to consider:
- Corner Shelves: Utilize often-wasted space in your home.
- Wall-Mounted: Save floor space and create a modern look.
- Variable Heights: Accommodate different book sizes and personal items.
- Integrated Lighting: Enhance the visual appeal with built-in lights.
Each option can be tailored to fit not only your space but your style and needs as well.
Functional Adaptability
Your storage needs may evolve over time as your book collection grows or changes. Custom-DIY bookshelves can adapt to those needs. For example, if you start with a small shelf and realize you need more space, you can easily expand your shelf setup. You can design shelves with removable sections or add additional components whenever you need more storage.
Quality and Craftsmanship
Taking on the creation of your own bookshelves allows you to maintain a higher level of quality than mass-produced options. You can select premium materials and pay attention to every detail. This means your custom furniture can be built to withstand the test of time, resisting wear and tear much better than lower-quality store-bought products.
Creative Fulfillment
Building your own bookshelves can be an incredibly satisfying creative outlet as well. It engages your hands, mind, and heart, allowing you to reconnect with your imaginative side. Many find that completing a DIY project is rewarding, sparking joy every time you use your bookshelf. You might find it fulfilling to see your labor and creativity on display in your own home.
Environmentally Friendly
For those who are eco-conscious, DIY projects offer a greener alternative to buying pre-built furniture. When you construct your own shelves, you have complete control over the materials, which can be sourced sustainably. Using reclaimed wood or non-toxic finishes can significantly reduce your carbon footprint, making your contribution to the environment a commendable one.
Connection to the Space
Custom-built DIY bookshelves can foster a deeper connection between you and your home. By putting in the effort to create something unique, you’ll likely develop a fondness for that piece of furniture. Over time, it becomes part of your family narrative, holding memories beyond just the books it carries.
By embracing the art of creating custom-DIY bookshelves, you not only gain functional benefits but also enrich your living space with your personal touch. It’s a journey that enhances your relationship with your home and provides a delightful platform for showcasing your book collection.
Incorporating Gothic Aesthetics into Modern Furniture
In a world dominated by sleek lines and minimalism, the resurgence of Gothic aesthetics offers a captivating alternative for modern furniture design. The Gothic style, characterized by intricate details, rich textures, and dark hues, can seamlessly blend into contemporary spaces, creating an alluring atmosphere. Here’s how you can incorporate Gothic elements into your furniture choices without overwhelming your home.
Understanding Gothic Aesthetics
Gothic aesthetics stem from the medieval period and are often associated with cathedrals and grand architecture. Think of pointed arches, ribbed vaults, and ornate detailing. These features translate beautifully into furniture through:
- Intricate Carvings: Look for pieces that showcase elaborate woodwork.
- Rich, Dark Colors: Incorporate colors like deep purples, blacks, and deep greens.
- Luxurious Fabrics: Use heavy materials like velvets and brocades that evoke a sense of mystery.
Choosing the Right Furniture Pieces
When selecting furniture that reflects Gothic style, it’s important to focus on specific pieces that can create focal points within your space.
- Sofas and Chairs: Look for upholstery that combines rich fabrics with velvet or leather finishes. Consider designs with solid, carved wood frames that feature dramatic shapes.
- Tables: Opt for dining tables with elaborate bases, perhaps featuring ornate legs or intricate carvings. Coffee tables should feel substantial and well-crafted, making a statement in your living area.
- Bookshelves: Design or choose bookshelves that mimic the grand arches of Gothic architecture. Dark wood finishes can enhance the overall aesthetic.
Utilizing Color and Texture
Gothic aesthetics shine brightest through the effective use of color and texture. A well-thought-out color palette can accentuate the Gothic elements in your furniture:
| Color | Suggested Usage |
|---|---|
| Deep Red | Add through fabric accents like pillows or throws. |
| Dark Green | Use for upholstery or large decorative pieces. |
| Black | Incorporate as a primary color in furniture pieces and flooring. |
Texture plays a critical role, too. Consider mixing smooth surfaces with rough or ornate details. For instance, pairing a sleek metal table with a heavily textured velvet chair can create intriguing contrasts.
Lighting Matters
The right lighting showcases Gothic furniture effectively and highlights its unique features. Consider these tips:
- Chandeliers: Opt for wrought-iron or crystal chandeliers that fit the Gothic theme. They can act as statement pieces that draw the eye upwards.
- Candle Holders: Use candelabras on tables or shelves for that quaint medieval touch.
- Wall Sconces: Incorporate sconces that match the overall aesthetic to create warm, ambient lighting.
Accessorizing with Gothic Elements
To tie together the Gothic design, it’s essential to include accessories that complement your furniture choices:
- Artwork: Hang dark-themed art, such as portraits or landscapes with dramatic lighting.
- Mirrors: Utilize ornate framed mirrors that reflect light and expand your space.
- Decorative Objects: Include items like antique books, dark stone sculptures, or mystical-themed decor to breathe life into the Gothic ambiance.
Gothic aesthetics into modern furniture requires a delicate balance of opulence and restraint. By carefully selecting pieces that resonate with this style, you can create a home that feels both sophisticated and steeped in history. Remember, the goal is to evoke a sense of wonder and nostalgia while ensuring that your space remains functional and inviting.
Step-by-Step Guide to Building Your Coffin Bookshelf
Crafting a coffin bookshelf is an exciting project that adds character to your space. This unique design combines functionality with an artistic flair, allowing you to showcase your favorite books while making a bold statement. If you’re ready to dive into this creative endeavor, this guide will provide you with step-by-step instructions to build your own coffin bookshelf.
Materials and Tools Needed
Before getting started, gather all necessary materials and tools. Making a coffin bookshelf requires some basic woodworking skills, so having the right items on hand will make the process smoother.
- 1. Materials:
- 3/4 inch plywood (for the main structure)
- Wood screws
- Wood glue
- Wood stain or paint (optional for finishing)
- Sandpaper (medium and fine grit)
- 2. Tools:
- Circular saw or table saw
- Drill with screwdriver bits
- Miter saw (for angled cuts)
- Clamps
- Measuring tape
- Pencil for marking
- Safety goggles
Step 1: Planning Your Design
Start by sketching a blueprint of your coffin bookshelf. Determine the dimensions based on your space and what you plan to store on it. A typical coffin bookshelf might be around 4 feet long, 2 feet wide, and 1 foot deep. You can customize the style to have different shelf heights to accommodate various book sizes.
Step 2: Cutting the Wood
Now it’s time to cut your plywood pieces. Follow your design closely and make these cuts:
- Two side panels: 48 inches x 12 inches
- Top panel: 36 inches x 12 inches
- Bottom panel: 36 inches x 12 inches
- Two shelves (adjustable if desired): 36 inches x 10 inches
- Face panel (front door): cut to shape of a coffin, approximate size 36 inches x 12 inches
Use your circular saw for straight cuts, and the miter saw for angles on the face panel if you want a more defined coffin shape.
Step 3: Assembling the Shelves
With all pieces cut, start assembling your coffin bookshelf. Here’s how:
- Attach the Side Panels: Use wood glue and screws to secure the two side panels to the top panel.
- Add the Bottom Panel: Ensure it’s flush against the sides and attach it using screws.
- Install Shelves: For adjustable shelves, make sure to drill holes on the inside of the side panels for shelf pins to secure the shelves at various heights.
- Attach the Face Panel: Secure the face panel to the front using hinges. This way, you can create a door that opens for easy access to your books.
Step 4: Sanding and Finishing
Once your structure is assembled, it’s time to sand everything smoothly. Use medium grit sandpaper for rough edges and switch to fine grit for a polished finish. After sanding, apply your choice of wood stain or paint to give your bookshelf a final look that fits your décor.
Step 5: Final Assembly and Installation
After finishing, let your bookshelf dry completely. If desired, you can attach it to the wall for extra stability, especially if you have children or pets around. Use wall anchors to secure the bookshelf to the studs in your wall.
Maintenance Tips
To ensure your coffin bookshelf stands the test of time, consider the following tips:
- Keep it out of direct sunlight to prevent fading.
- Dust the shelves regularly.
- If using wood finish, consider reapplying every few years for protection.
Building a coffin bookshelf can be a fun and rewarding experience, allowing your creativity to shine. Whether you’re an experienced woodworker or a beginner, following these steps will help you create a unique piece of furniture that not only holds your books but also serves as a conversation starter in your home.
Choosing the Right Materials for Your DIY Projects
When embarking on a DIY project, the materials you choose can significantly affect the outcome. Selecting the right materials not only ensures that your project is durable but also enhances its aesthetics. Here are key considerations to help in making wise decisions about materials.
Understanding Your Project Needs
Before you dive into selecting materials, it’s crucial to assess the specific needs of your project.
- Purpose: Determine what you need the finished product to do. Is it functional or decorative?
- Location: Consider where the project will be placed. Outdoor items may require weather-resistant materials.
- Budget: Establish a budget beforehand to help narrow down your options.
Types of Materials
Familiarizing yourself with the types of materials available will empower you to make informed choices.
1. Wood
Wood is a popular choice for many DIY projects. It offers a natural aesthetic and is versatile for various applications.
- Pine: Affordable and easy to work with, great for beginners.
- Oak: Highly durable and perfect for furniture making.
- Plywood: Good for shelving and structural projects.
2. Metal
Metal can add a modern touch to DIY projects. Common metals include:
- Aluminum: Lightweight and resistant to corrosion.
- Steel: Very strong, making it ideal for heavy-duty items.
- Brass: Offers a vintage look, often used in fixtures and hardware.
3. Plastic
Plastic materials are lightweight and can be easily shaped. They are often used in:
- Storage solutions: Bins and containers.
- Gardening: Pots and planters.
Durability and Maintenance
Consider how long you want your project to last and how much maintenance you are willing to perform.
- Weather-resistant materials: Opt for treated wood or metals for outdoor projects.
- Maintenance requirements: Some finishes require regular upkeep. Look for durable finishes like varnishes.
Safety Considerations
When working with materials, keep safety at the forefront of your mind. Here’s what to remember:
- Protective gear: Always wear gloves, goggles, and masks as needed.
- Material hazards: Research potential risks, especially with chemicals or heavy materials.
Easy Reference Table of Common Materials
| Material | Best Uses | Pros | Cons |
|---|---|---|---|
| Wood | Furniture, decor | Beautiful finish, easy to shape | Can warp, requires maintenance |
| Metal | Structures, fixtures | Very durable, modern look | Can rust, harder to work with |
| Plastic | Storage, crafts | Lightweight, moisture-resistant | Less environmentally friendly, can fade |
Cost Factors
The cost of materials can vary greatly based on quality, type, and availability. Keep an eye out for sales or bulk deals to save money. Remember these tips:
- Buy in bulk: Great for commonly used items like screws or wood.
- Local stores: Sometimes they offer lower prices than big-box retailers.
Ultimately, the right materials will make your DIY projects not just effective but also enjoyable. Taking the time to research and choose wisely can bring your vision to life while ensuring your creations are safe and built to last.
Key Takeaway:
Creating a coffin bookshelf can be an exciting and creative project that not only enhances your home decor but also serves as a functional piece of furniture. This unique design adds a touch of personality and flair, especially for those who appreciate gothic aesthetics or wish to break away from traditional bookshelf designs. Each of the topics covered in the article helps to illuminate the many benefits of planning and completing a custom DIY bookshelf, specifically one in the shape of a coffin.
One key takeaway is the importance and advantages of custom DIY projects. When you create your own pieces, such as a coffin bookshelf, you have the freedom to tailor the design to your specific needs and tastes. This allows you to express your individuality in ways that store-bought furniture often cannot. The article discusses how custom bookshelves can make a bold statement in any room, while also serving practical purposes for your book collection and decorative items.
Gothic aesthetics into modern furniture designs is another compelling theme in the article. Gothic decor often invites a sense of mystery and intrigue, transforming your space into something extraordinary. By using creative coffin bookshelf plans, you can seamlessly blend this unique style with contemporary home decor trends, allowing for a striking contrast that catches the eye.
The step-by-step guide included in the article is indispensable for anyone looking to embark on this project. It breaks down the process of building a coffin bookshelf into manageable steps, making it accessible for both novice and seasoned DIY enthusiasts. Understanding the right materials to use is also crucial, as it ensures durability and a quality finish. The article provides insightful tips on material selection, steering readers toward options that align with both aesthetic appeal and structural integrity.
Building a coffin bookshelf not only reveals your creativity but also enriches your living space with a distinct design. The fusion of gothic style with functional furniture speaks to an imaginative approach to home decor, making it a worthwhile investment in your DIY journey. Whether you are a lover of books, unique design, or both, this project promises to be rewarding and impactful.
Conclusion
Embracing the concept of coffin bookshelves can transform your living space into a hub of creativity and personality. This unique piece of furniture not only serves as a functional storage solution but also makes a bold statement in home decor. By exploring creative coffin bookshelf plans, you can incorporate both Gothic aesthetics and modern sensibilities, resulting in a truly one-of-a-kind accent for your home.
The benefits of custom DIY bookshelves are numerous; they allow you to express your individuality while also ensuring that the design suits your specific space. Whether you love reading, collecting special items, or showcasing your artistic side, your coffin bookshelf can be tailored to meet your needs. A step-by-step guide to building your own coffin bookshelf provides a helpful roadmap, making the project accessible even if you’re a beginner.
Selecting the right materials is crucial for your DIY project. From wood types to finishes, each choice impacts both the durability and the aesthetic appeal of your creation. With careful planning and inspiration, you can create a bookshelf that complements your style and stands the test of time.
Ultimately, your coffin bookshelf can become a captivating focal point in any room, blending function and artistry. Whether you place it in a home office, living room, or library, this distinctive furniture piece invites intrigue and conversation. Get ready to embark on your DIY journey, and let your creativity shine through in every aspect of your coffin bookshelf!