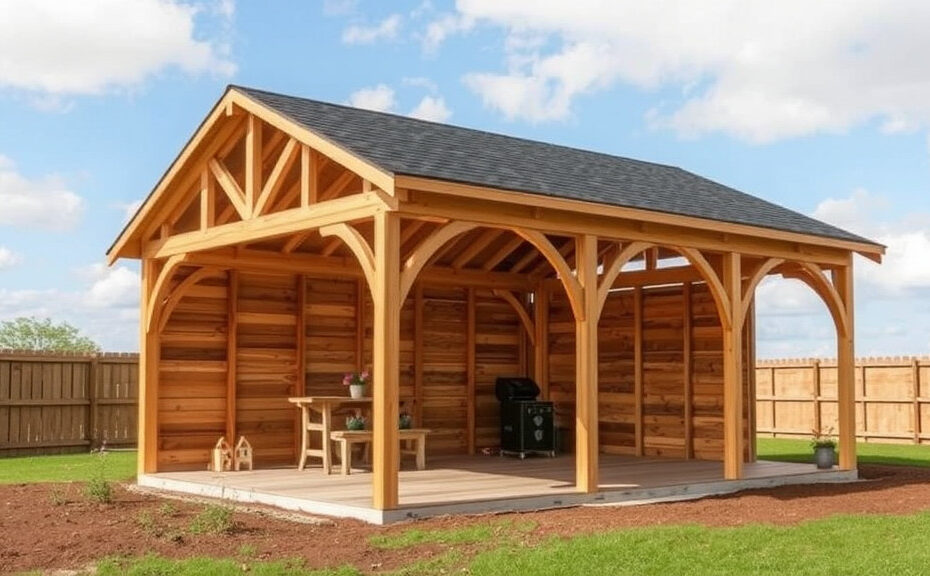
Essential Steps to Build a Post and Beam Shed
Building a post and beam shed can be an exciting and rewarding project. Not only does it provide practical storage space, but it also adds charm to your property. By following essential steps, you can create a sturdy and beautiful structure that meets your needs. Here’s how to get started.
Gather Your Materials
Before beginning your shed project, you need to collect the necessary materials. Here are the main items you’ll need:
- Pressure-treated lumber for the posts
- Beams (horizontal supports)
- Plywood or similar wood for the walls and roof
- Metal brackets and screws for reinforcement
- Roofing materials (shingles or metal sheets)
- Concrete mix for post footings
- Tools: a saw, drill, level, measuring tape, and hammer
Choose a Suitable Location
Finding the right spot for your shed is crucial for both functionality and aesthetics. Look for a level area that is easily accessible. Consider the following factors:
- Sunlight exposure – does your shed need natural light?
- Drainage – keep it away from puddles or muddy areas.
- Local zoning regulations – ensure you comply with any building restrictions.
Design Your Shed
Now that you have your materials and location, designing your shed comes next. Start by sketching a simple plan. Consider the following:
- Size: Determine how big you want your shed to be. Think about what you will store inside.
- Style: Decide on the aesthetics, such as the roof angle and window placement.
- Functionality: Make sure to plan for doors and any shelving you may need.
Prepare the Foundation
Building a strong foundation is essential for the durability of your shed. Here’s how to do it:
- Mark the outline of your shed on the ground using stakes and string.
- Dig holes for the corner posts, making them at least 2 feet deep for stability.
- Pour concrete into each hole, placing your posts in while ensuring they are level and vertical.
- Allow the concrete to set according to the instructions.
Construct the Frame
Once the foundation is ready, it’s time to build the frame. Follow these steps:
- Attach the bottom beams to the posts using metal brackets and screws to create a solid base.
- Add vertical posts at regular intervals to support the walls.
- Install the top beams to connect the posts and provide structure for the roof.
Wall and Roof Installation
Next, you will need to install the walls and roof of your shed:
- Cut panels of plywood to fit between the vertical posts, securing them with screws.
- For the roof, consider using plywood sheets that are cut to match your design. Attach them securely to the top beams.
- Apply your choice of roofing material, ensuring it is watertight.
Finish Your Shed
Now that the basic structure is complete, it’s time to add finishing touches:
- Install doors that swing open or slide, depending on your preference.
- Add windows for light and ventilation, if desired.
- Consider painting or staining your shed to match your home.
Landscaping Around Your Shed
Don’t forget about the area surrounding your shed. This can enhance the overall appearance. Here are some ideas:
- Plant flowers or shrubs to soften the structure.
- Add a gravel path leading to the shed for easy access.
- Install outdoor lighting to illuminate the area at night.
Building a post and beam shed takes careful planning and execution, but with these essential steps, you can create a structure that is both functional and aesthetically pleasing. As a result, you will have a space that you can enjoy for years to come!
Choosing the Right Materials for Your Shed
When it comes to building a shed, choosing the right materials is crucial. The materials you select not only affect the overall appearance but also impact durability, maintenance, and cost. Here’s a guide to help you select the best options for your shed project.
Wood
Wood is a favorite choice among shed builders for its natural look and versatility. However, not all wood is created equal. Here are some popular options:
- Pressure-Treated Lumber: This type of wood is treated to resist rot and insect damage, making it ideal for the foundation and ground-level components.
- Cedar: Known for its natural resistance to decay, cedar is a beautiful choice for siding and trim. It has a rich color and a pleasant aroma.
- Plywood: Lightweight and strong, plywood is commonly used for walls and floors. It’s easy to work with and provides good insulation.
Metal
Metal sheds are increasingly popular due to their durability and low maintenance. When considering metal, you have several options:
- Steel: The strongest of the metal choices, steel sheds can withstand harsh weather conditions. They are resistant to rust if properly coated.
- Aluminum: Lightweight and resistant to corrosion, aluminum sheds are great for those looking for portability and ease of installation.
- Galvanized Steel: A step up from regular steel, galvanized steel is coated with zinc, giving it additional rust resistance for long-term use.
Vinyl
Vinyl has become an appealing option for shed construction. Its advantages include:
- Low Maintenance: Unlike wood or metal, vinyl does not require painting or staining and can simply be washed with soap and water.
- Durability: Vinyl is resistant to fading, cracking, and warping, ensuring your shed looks great for years.
- Variety of Colors: With vinyl, you can choose from many colors and styles, which can help your shed fit nicely into your landscape.
Roofing Material
Choosing the right roofing material is just as important as the walls and structure. Here are some popular roofing options:
- Asphalt Shingles: These are affordable and available in various styles. They offer good waterproofing and can last for 15-30 years.
- Metal Roofing: Ideal for shedding snow and rain, metal roofs are durable and can last even longer than asphalt. They may be slightly more expensive but often pay off in the long run.
- Wood Shingles: For a rustic look, consider wood shingles. They require more maintenance but can provide a unique aesthetic.
Flooring Options
Don’t overlook the flooring when selecting materials for your shed. Here are common flooring choices:
- Concrete: Extremely durable and resistant to pests and moisture, concrete is an excellent choice for heavy tool storage.
- Wooden Boards: If you prefer a wooden floor, select pressure-treated lumber to prevent rot and prioritize stability.
- Plywood with a Sealant: A strong option for light use, plywood is easy to install and can last when adequately sealed.
Insulation
If you plan to use your shed for hobbies or as a workshop, consider adding insulation to regulate temperature. Here are some insulation materials:
- Foam Boards: These provide good thermal resistance and can be easily cut to fit.
- Fiberglass Batts: An affordable option, fiberglass batts can be placed between wall studs to help control temperature.
- Reflective Insulation: Particularly useful in hot climates, reflective insulation can keep heat out effectively.
Choosing the right materials for your shed can be a rewarding process. It not only impacts the aesthetics of your outdoor space but also ensures the longevity and functionality of your shed. Take the time to explore different materials, and don’t hesitate to consult with professionals. With the right information and preparation, you can create a shed that meets your needs and enhances your property’s value.
Designing a Functional Layout for Your Post and Beam Shed
When embarking on a project to create a post and beam shed, one of the most crucial steps is to design a functional layout. This process ensures that your shed meets your needs while making efficient use of the space available. To begin, consider the purpose of your shed. Are you using it as a workshop, storage area, or perhaps a gardening shed? Defining the primary function will guide many of your design decisions.
Start with a rough sketch of your desired layout. You don’t need to be an architect; just creating a simple drawing will help you visualize the space. Consider incorporating these elements into your design:
- Workspace: If your shed will be used for projects, allocate an area for workbench space.
- Storage: Plan designated areas for tools, supplies, and equipment. Shelves or pegboards can be helpful for organization.
- Accessibility: Ensure that your layout allows for easy access to all areas of the shed. Arrange items so that frequently used tools are near the door.
- Lighting: Consider where natural light comes from. Position windows strategically to enhance visibility while working inside the shed.
- Ventilation: Good airflow is essential, particularly in a workshop setting. Ensure that you have windows or vents to keep the air fresh.
Next, think about the flow of movement within the shed. You want to create a layout where you can work efficiently without unnecessary interruption. Here are some tips to achieve a natural flow:
- Zones: Divide your shed into specific zones (like tools, gardening, or seasonal items) to keep everything organized.
- Pathways: Leave enough space between zones, ensuring there’s enough room to move around without obstacles.
- Separation: If needed, use partitions to separate different projects or areas of focus within your shed.
Your tools and equipment can take up significant space. To maximize functionality, consider vertical storage solutions. You might add shelves that go up to the ceiling or wall-mounted storage units. They can free up valuable floor space, making it easier to move around.
Creating a utility area is another smart design choice. This can accommodate items such as a refrigerator for garden produce or a potting bench for your plants. When planning this area, think about how you’ll use it and position outlets for any necessary electrical appliances.
The location of your post and beam shed is significant. Ideally, it should be positioned where it is easily accessible from your home or main workspace. If you’re using the shed for outdoor activities, you might want it closer to your garden or yard. Provide a clear path leading to the shed, ensuring it’s easily accessible in all weather conditions.
Consider the aesthetics of your design. It’s not all about functionality; you’ll want your shed to look good, too! Selecting the right materials and colors can blend the shed seamlessly into your landscape. This consideration can enhance the visual appeal while still being practical.
As you finalize your design plans, review them critically. Here are some questions to ask:
- Does the layout suit your primary needs?
- Have you maximized storage options without overcrowding the space?
- Is there adequate lighting and ventilation?
- Will the shed remain accessible and functional in different seasons?
Once you are satisfied with your layout and design plans for your post and beam shed, you are one step closer to creating a functional space that serves your needs. Take your time making these decisions; a well-thought-out layout will enhance your experience and satisfaction with your new shed. By carefully considering these factors, you can ensure that your shed will be an asset for years to come.
Tools You’ll Need for a Successful Build
Building a post and beam shed can be a fulfilling project, providing you with extra storage space or even a workshop. To ensure your build goes smoothly, having the right tools on hand is essential. Below is a detailed list of the tools that will help you achieve a successful construction without unnecessary headaches.
Essential Hand Tools
- Measuring Tape: Accurate measurements are key to ensuring your shed is built to specification. A quality measuring tape, preferably 25 feet long, will help you measure wood and space accurately.
- Carpenter’s Square: This tool will assist you in marking precise right angles, which is crucial for framing your shed properly.
- Level: A leveling tool ensures that your posts and beams are even. Use a spirit level for small checks or a laser level for longer distances.
- Hammer: A reliable hammer is a must-have for driving nails and assembling your shed.
- Saw: You will need a circular saw or a miter saw to cut your lumber to the desired lengths. For finer cuts, a handsaw may also come in handy.
Power Tools for Efficiency
While hand tools are essential, power tools can make your build quicker and more efficient. Here are some important power tools to consider:
- Drill and Drill Bits: A cordless drill will help with both drilling holes and driving screws. Ensure you have a variety of drill bits to accommodate different sizes and materials.
- Impact Driver: This tool is especially helpful for driving screws, as it provides more torque. It can significantly speed up your assembly process.
- Reciprocating Saw: Also known as a sawzall, this tool can be beneficial for quick cuts, especially when dealing with thick materials.
Support Tools
To keep your work organized and manage materials effectively, consider these support tools:
- Work Benches: A sturdy workbench provides a reliable surface for cutting and assembling your materials.
- Clamps: Use clamps to hold pieces together while the adhesive sets or to maintain accuracy during drilling.
- Safety Gear: Don’t forget protective goggles, hearing protection, and gloves. Safety should always be a priority when working with power tools.
Foundation Preparation Tools
The foundation of your post and beam shed is crucial for stability and longevity. You will need specific tools for this stage:
- Shovel: A shovel is necessary for digging holes for the posts or creating a gravel base.
- Post Hole Digger: This tool will make digging deep holes easier, ensuring your posts are securely in the ground.
- String Line and Stakes: Use these to layout the foundation of your shed to maintain straight lines for your posts and beams.
Finishing Tools
After constructing your shed, you will need tools for the finishing touches:
- Sanding Block or Sander: To smooth the wooden surface and ensure it is ready for paint or sealant.
- Paint Brushes and Rollers: Use these to apply a protective layer to your shed, enhancing its durability against weather elements.
- Caulking Gun: This tool can seal gaps and joints, ensuring your shed is weatherproof.
With this comprehensive set of tools, you’ll be well-equipped to tackle your post and beam shed project. Each tool serves its purpose, helping you from the earliest stages of construction to the final touches. Having these tools ready will not only streamline your process but also enhance the quality of your work. So gather your tools, and get ready to create a functional and sturdy shed that meets your needs!
Maintenance Tips to Extend the Life of Your Shed
Your shed deserves the best care to ensure it lasts for many years. By following simple maintenance tips, you can keep your shed in excellent condition while protecting your investment. Here are several essential strategies to extend the life of your shed.
Regular Inspection
A great way to start your shed maintenance is through regular inspections. Make it a habit to examine your shed at least twice a year. This inspection allows you to detect problems early and address them before they escalate. Look for:
- Roof condition: Check for missing or damaged shingles, leaks, and any signs of water pooling.
- Walls: Examine the walls for cracks, rot, or pest invasion. Make sure the paint or finish is intact.
- Foundation: Ensure the foundation is stable and free from cracks or displacements that could lead to structural issues.
Cleaning and Debris Removal
Cleaning your shed regularly is crucial. Debris like leaves, dust, and dirt can lead to mold and mildew growth. Besides, clutter can attract pests and moisture. Here’s how to keep your shed clean:
- Clear the area: Start by removing any items stored in your shed. This allows you to clean every corner.
- Wash surfaces: Use a power washer or a garden hose with a scrub brush to clean walls, windows, and the roof.
- Remove debris: Clear gutters and downspouts to prevent water buildup that can damage your shed.
Protecting Your Shed from Pests
Pests can seriously damage your shed over time. To prevent infestations:
- Seal gaps: Inspect and seal any cracks or gaps in walls, doors, and windows to keep pests out.
- Use pest repellents: Consider placing natural pest repellents such as cedar chips or essential oils around your shed.
- Store wisely: Don’t store wood or other organic materials against your shed, as they can attract rodents and insects.
Weatherproofing Your Shed
Weather can affect your shed’s longevity, especially if it’s exposed to harsh elements. Here are tips for weatherproofing:
- Paint and stains: Use high-quality exterior paint or stains to protect wood surfaces from moisture and UV damage. Reapply every few years as needed.
- Roof maintenance: Ensure your roof is watertight. Repair any old shingles and replace them as necessary.
- Ventilation: Proper airflow can prevent mold and moisture buildup. Install vents or windows to allow air circulation.
Organizing the Interior
Keeping the inside of your shed organized helps maintain its functionality and aesthetic. Here are some tips:
- Use shelves: Install shelving to efficiently store tools and supplies. This prevents items from piling up and makes it easier to clean.
- Label storage containers: Clearly label boxes and bins for quick identification, ensuring you can find items easily.
- Regularly sort through items: Take time to remove unnecessary items and clutter at least once a year.
Annual Maintenance Tasks
To ensure your shed stays in tip-top shape, perform these annual tasks:
- Inspect the roof: Beyond the semi-annual checks, an in-depth roof inspection can catch any serious issues before winter.
- Reapply preservatives: If your shed is made of wood, treat it with preservatives that protect against moisture and decay.
- Check fasteners: Tighten any loose screws, nails, or bolts to keep everything secure and safe.
Final Thoughts
By implementing these maintenance strategies, you can prolong the life of your shed significantly. A well-maintained shed not only protects your tools and belongings but also enhances your property’s value and aesthetic appeal. Commit to these maintenance tasks to enjoy many trouble-free years with your shed.
Conclusion
Building a post and beam shed can be a rewarding project that enhances your outdoor space while providing valuable storage. By following the essential steps outlined in this guide, you can construct a sturdy and functional structure that meets your needs. Choosing the right materials is crucial; select high-quality wood and roofing materials to withstand the elements and ensure longevity.
Designing a functional layout will make your shed a practical asset, whether for tools, gardening supplies, or recreational devices. Prioritize organization in design to maximize your space. To bring your vision to life, gather the necessary tools that will make construction easier, from the foundational tools like hammers and saws to more specialized equipment for precision work.
Don’t overlook maintenance. Regularly check for signs of wear and make repairs as needed to keep your shed in excellent condition. This will prolong its life and maintain its appearance. With the right planning and execution, your post and beam shed can be a lasting addition to your property, providing both functionality and style for years to come. By approaching your project with care, you are not just building a shed; you are creating a space that reflects your needs and enhances your outdoor experience. Enjoy the process and take pride in your handiwork!