How To Set Up a Kreg Jig for Beginners
Setting up your Kreg Jig can transform your woodworking projects by providing strong, hidden joints, giving your creations a professional finish. If you’re a beginner, the process may seem daunting, but with a little guidance, you’ll find it easy to use. Here’s how to set up your Kreg Jig in just a few simple steps.
Gather Your Materials
Before you begin, collect the essential materials you’ll need:
- Kreg Jig (any model)
- Wood pieces to be joined
- Kreg screws
- Drill with a drill bit (usually included with the Kreg Jig)
- Clamps (optional for added stability)
- Measuring tape
- Pencil for marking
Prepare Your Wood
Start by measuring and cutting your wood pieces. Make sure the ends you’ll be joining are smooth and flat. Use a pencil to mark where you want to drill pocket holes. A common practice is to drill these holes about 1-1/2” from the edge of the board.
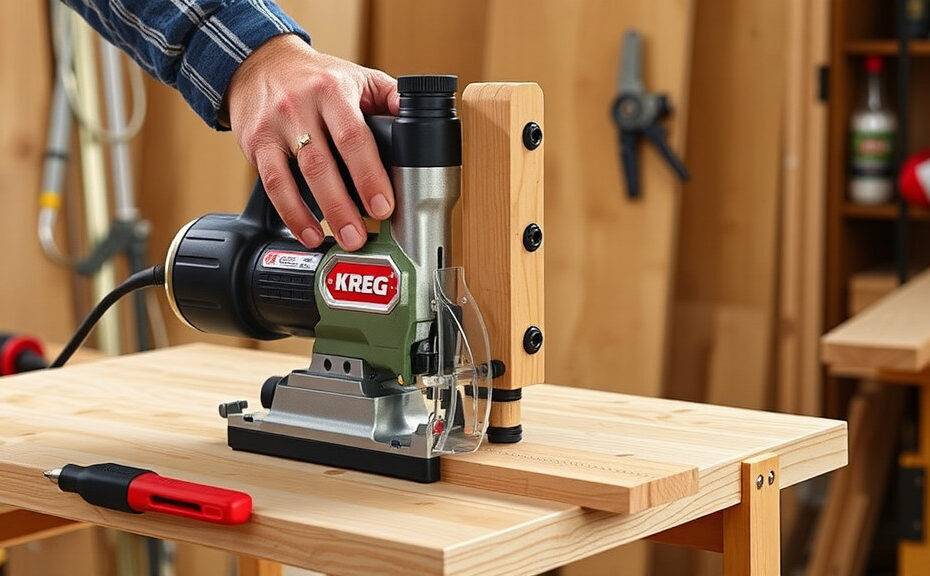
Set the Kreg Jig for Your Wood Thickness
One of the most important parts of using a Kreg Jig is adjusting it to match the thickness of your wood. Here’s how:
- Look at the thickness of your wood. It will typically be either 3/4” or 1/2”.
- On the Kreg Jig, adjust the blue sliding block to match your wood thickness. There are marked indicators for 1/2”, 3/4”, and other thicknesses.
- Next, set the drill bit collar. Slide the collar onto the drill bit and tighten it at the same measurement as the thickness you just set. This controls how deep your pocket hole will be.
Drill the Pocket Holes
With your Kreg Jig set up, you can now drill the pocket holes.
- Securely clamp your wood piece into the Kreg Jig.
- Align your drill with the hole guide on the Kreg Jig.
- Drill until you feel the drill go through the wood, which indicates that the pocket hole has been created.
- Repeat this step for as many holes as needed on your wood piece.
Join Your Wood Pieces
After drilling your holes, it’s time to assemble your pieces. Position the wood pieces so that the pocket holes are facing the inside of the joint. Use Kreg screws to secure the wood together. It’s often helpful to start with one screw and work your way down the length of the joint to ensure everything aligns correctly.
Final Adjustments
Once your screws are in place and your pieces are joined, check for any misalignment. If necessary, use a clamp to adjust the position while you tighten the screws. This will help prevent any shifting or popping that can occur if not secured properly. After everything is tight and aligned, you can fill in the pocket holes with plugs if desired if you’re looking for a cleaner look.
Practice Makes Perfect
Don’t worry if the first few attempts aren’t perfect. Like any new skill, practice is key. Try different wood types and thicknesses to see how your Kreg Jig performs. With each project, you’ll become more comfortable and efficient in setting up your jig.
Setting up a Kreg Jig is a straightforward process that opens the door to countless woodworking possibilities. By following these steps, you can take advantage of all that this handy tool offers. Enjoy your woodworking adventures and the satisfaction of creating strong, beautiful pieces!
Essential Tools Needed Alongside Your Kreg Jig
When diving into woodworking projects with a Kreg Jig, having the right tools is crucial to achieving high-quality results. While the Kreg Jig itself is an exceptional tool for creating pocket holes quickly and accurately, it works best when paired with additional instruments. Here’s a look at the essential tools you’ll need alongside your Kreg Jig to optimize your woodworking experience and make your projects come to life.
1. Drill
One of the most important tools to have is a reliable drill. A power drill is necessary for drilling the pocket holes that the Kreg Jig creates. Ideally, you should opt for a cordless drill. This will give you the freedom to move around your workspace without being restricted by a power cord. Look for a drill with variable speed settings and enough power to drive screws into the materials you plan to work with.
2. Clamps
Clamps are your best friends when working with a Kreg Jig. They hold your wood pieces securely in place as you make your cuts and assemble your projects. There are various types of clamps you might consider:
- Bar Clamps: Excellent for securing larger pieces of wood together.
- C-Clamps: Best for smaller projects that need steady support.
- Quick Grip Clamps: Offer speed and ease of use for quick adjustments.
Having a mix of these clamps on hand can help you tackle a variety of woodworking projects effectively.
3. Screwdriver
A good screwdriver is essential for assembly. While many prefer using a drill to drive screws, having a hand screwdriver handy can be quite useful for delicate work or for tightening screws without risking over-tightening. Be sure to have both Phillips and flathead screwdrivers available, as some projects may require different types of screws.
4. Measuring and Marking Tools
Accurate measurements and precise markings are vital for any woodworking project. Investing in high-quality measuring tools will pay off in the long run. Consider these:
- Tape Measure: A flexible and easy-to-use option for various measurements.
- Square: Essential for ensuring right angles and straight lines.
- Pencil and Marking Knife: Use a pencil for marking holes and a marking knife for more precise lines.
Having these tools will help you lay out your projects accurately and avoid mistakes that could cost time and materials.
5. Saw
No woodworking setup is complete without a good saw. Depending on your project, you might need different types of saws:
- Table Saw: Ideal for ripping large sheets of wood.
- Miter Saw: Makes precise crosscuts and bevel cuts.
- Jigsaw: Great for cutting curves and intricate designs.
Choosing the right saw will make your cuts cleaner and more precise, which will complement the pocket hole joinery created by the Kreg Jig.
6. Sanding Tools
Sanding is a critical step in the finishing process. Having a range of sanding tools at your disposal will help you achieve smooth surfaces and polished edges. Here are some recommended options:
- Sanding Block: Great for hand sanding to maintain control.
- Orbital Sander: Ideal for faster sanding over larger areas.
- Sandpaper: Have various grits on hand, from coarse to fine, to prepare your wood for finishing.
7. Safety Gear
Don’t forget about your safety. Protecting yourself while using tools is non-negotiable. Essential safety gear includes:
- Safety Glasses: Guard your eyes from sawdust and debris.
- Ear Protection: Protect your hearing when using power tools.
- Dust Mask: Prevent inhaling dust particles during sanding and cutting.
Equipping yourself with these essential tools will not only enhance your woodworking experience but also ensure your safety and the success of your projects. With your Kreg Jig and a well-rounded toolkit, you’ll be ready to tackle any woodworking challenge that comes your way.
Common Mistakes to Avoid When Using a Kreg Jig
When you embark on a woodworking project using a Kreg jig, the goal is to create strong and precise joints. However, there are several common mistakes that can hinder your success. By recognizing and avoiding these pitfalls, you can enhance your woodworking experience and achieve professional results. Here are some of the most frequently encountered mistakes when using a Kreg jig.
Not Choosing the Right Screw Length
One of the most significant missteps is selecting the wrong screw length for your project. Using screws that are too long can cause damage to your wood, while screws that are too short might not provide adequate strength. To avoid this mistake, always choose screws that are appropriate for the thickness of your workpieces. A simple rule of thumb is that the screw should be about 1-1.5 times the thickness of the material being joined.
Forgetting to Adjust the Drill Bit Depth
Many users forget to adjust the drill bit depth when setting up their jig. The drill bit depth determines how deep the pocket hole will be drilled. If it’s not set correctly, you risk drilling through the material or not deep enough for a proper joint. Make sure to consult the Kreg jig settings for the materials you are using and adjust the bit depth accordingly before you start drilling.
Neglecting to Use the Right Jig Settings
Every Kreg jig model has specific settings that cater to a variety of material thicknesses. Neglecting to adjust the jig for the thickness of your wood can lead to poorly aligned holes and weak joints. Always double-check the settings against your materials to ensure accuracy. This attention to detail goes a long way in ensuring your project turns out as planned.
Overdriving Screws
Overdriving screws is another common mistake that can lead to problems. If you apply too much force while driving the screw, it can strip the hole or even split the wood. Use a clutch setting on your drill to prevent overdriving. This feature allows you to set the torque level, ensuring you drive the screw just right without damaging your materials.
Not Clamping the Wood Securely
When using a Kreg jig, adequate clamping is essential. Failing to clamp your wood securely can lead to movement while drilling, resulting in misaligned holes. This misalignment not only affects the joint integrity but can also make assembly frustrating. Always use quality clamps and check that your materials are held securely in place before starting any drilling.
Ignoring Material Grain Direction
The direction of the grain in your wood can affect the strength and stability of your joints. Ignoring this can lead to issues such as splitting or weakness in the joint area. Always be mindful of the grain direction when positioning your workpieces. Aligning the Kreg jig with the grain can help you achieve stronger and more reliable joints.
Failing to Test the Setup
Before diving into your main project, it’s wise to test your setup on scrap wood. Failing to do so can lead to unnecessary mistakes that might affect the finished product. Run through your Kreg jig setup on scrap pieces that mimic your project. This test will allow you to identify any adjustments that need to be made in terms of drill bit depth, screw length, and alignment.
Overlooking Cleanup After Use
An often-overlooked step is cleaning your Kreg jig after each use. Sawdust and debris can accumulate, which may affect its performance in future projects. After completing your work, take a moment to clean your jig to ensure you get consistent results every time you use it. A clean workspace and tools prolong your equipment’s life and keep your projects moving smoothly.
By steering clear of these common mistakes, you will significantly improve your experience and outcomes when using a Kreg jig. Take your time to make adjustments, test your setup, and ensure everything is in order before drilling. Happy woodworking!
Advanced Techniques to Maximize Your Kreg Jig Use
Using a Kreg Jig can transform your woodworking projects, making them more efficient and enjoyable. However, mastering advanced techniques can help you unlock its full potential. Here are some expert strategies to enhance your Kreg Jig experience.
Understanding Your Kreg Jig Setup
The first step to utilizing advanced techniques is to ensure your Kreg Jig is set up correctly. Here are essential steps to follow:
- Adjust the drill bit depth: Always set the depth collar on your drill bit accurately. This ensures that your holes are drilled to the correct depth for strong joint performance.
- Position the wood properly: Align your wood piece firmly against the Kreg Jig. A secure grip will prevent any movement while drilling.
- Select the right board thickness: Kreg Jigs are designed for various board thicknesses. Make sure you choose the right setting on the jig for your project.
Using Multiple Holes Efficiently
One way to maximize your Kreg Jig’s capabilities is by learning to drill multiple holes effectively. This technique is particularly useful for larger projects where stability is key:
- Plan your holes: Before starting, sketch out where you want the pocket holes and mark the locations. Aim for symmetry and even spacing to enhance the overall look.
- Use a spacer: If you need to create several holes in a row, use a spacer block. This maintains uniform distance and speeds up the drilling process.
- Utilize a jig extension: For wider boards, consider jig extensions that make it easy to drill multiple holes without having to readjust your setup constantly.
Enhancing Joint Strength
To improve the strength of your joints, consider incorporating the following methods:
- Use glue: In addition to pocket screws, adding wood glue significantly enhances the strength of your joints. Apply a thin layer before fastening with screws.
- Choose the right screw type: Kreg screws are specially designed for pocket hole joinery. Using screws with a flat head will provide a better fit in the pocket hole.
- Reinforce corners: For corner joints, consider adding a reinforcing block or brace. This step adds extra stability and ensures longevity in your project.
Creative Applications for Your Kreg Jig
Your Kreg Jig is not just for simple woodworking projects. You can extend its use creatively across various applications:
- Furniture building: Use your Kreg Jig for table legs, chair frames, and even shelving units to achieve clean and sturdy construction.
- Custom cabinetry: Create secure and invisible joints in kitchen cabinets, making your DIY projects look professional.
- Outdoor furniture: Build outdoor features like benches or garden trellises with confidence, knowing your joints will withstand the elements.
Boosting Your Productivity
To save more time and make the most out of each session in your workshop, consider these productivity tips:
- Pre-drill materials: When preparing multiple pieces, pre-drilling them in one go helps you stay organized and saves time.
- Create a dedicated workstation: Having a designated area for your Kreg Jig setup can make it easy to dive into projects without unnecessary delays.
- Implement a vision board: Keeping your designs and ideas visible through sketches or photographs can inspire and guide your work.
By applying these advanced techniques, you’ll not only maximize your Kreg Jig’s capabilities but also enhance your woodworking experience. With practice and creativity, the quality of your projects will reach new heights.
Projects You Can Create with a Kreg Jig
If you’re eager to dive into woodworking and want to achieve professional results, a Kreg Jig is a game-changer. This tool allows you to create sturdy, precise joints with ease. Here are several exciting projects you can take on with a Kreg Jig that will help you improve your skills and create beautiful pieces for your home.
Furniture Projects
- Dining Table: Build a beautiful, rustic dining table using 2x4s or reclaimed wood. With pocket holes, you can join the tabletop and legs securely, ensuring stability and style.
- Bookshelves: Create custom bookshelves to suit your space. The Kreg Jig allows you to easily assemble shelves, making them both functional and aesthetically pleasing.
- Benches: A simple outdoor or indoor bench can be made efficiently. Use 2×6 boards for the seat and legs, ensuring a sturdy design that complements your space.
Home Decor Items
- Picture Frames: Craft unique picture frames that showcase your favorite memories. The Kreg Jig helps you assemble frames without visible screws, lending a clean finish.
- Wall Art: Create decorative wall art using wood planks. With pocket holes, you can easily attach pieces together, forming intricate designs.
- Candle Holders: Design custom candle holders that enhance your home’s ambiance. You can mix and match various wood types for a dynamic look.
Outdoor Projects
- Planter Boxes: Create beautiful planter boxes for your garden or patio. Using treated wood minimizes moisture damage, allowing your plants to thrive.
- Garden Bench: Make a comfortable garden bench to relax in nature. The Kreg Jig ensures your bench is sturdy enough for daily use.
- Firewood Rack: Build a functional firewood rack that keeps your wood organized and dry. Pocket holes make assembly simple and quick.
Storage Solutions
- Storage Crates: Make storage crates for toys or blankets. Each crate can easily be assembled using a Kreg Jig, and you can customize the size to fit your needs.
- Under-Bed Storage: Eager to maximize space? Build flat storage boxes that neatly slide under your bed, keeping your items hidden yet accessible.
- Bathroom Tower Shelf: A tall, narrow shelf can fit in small spaces, storing towels or toiletries. The Kreg Jig allows you to create strong supports for each shelf level.
Utility Projects
- Dog Bed Frame: Create a stylish bed frame for your furry friend, ensuring it’s both comfortable and fits your decor.
- Work Table: Set up a dedicated work area with a sturdy table. You can personalize its height and surface size based on your DIY needs.
- Tool Storage Rack: Design a custom storage rack for your garage or workshop tools, helping you keep everything organized and within reach.
As you explore these projects, remember that the Kreg Jig not only simplifies woodworking but also enhances the quality of your work. Each project lets you practice different techniques, exposing you to new ideas and methods. Whether you’re looking to furnish your home, create fun decor, or organize your space, the Kreg Jig is an essential tool that makes these projects achievable and enjoyable. Dive into your next woodworking venture with this fantastic tool and unlock your creativity!
Conclusion
Setting up a Kreg Jig opens up a world of possibilities for both novice and experienced woodworkers. By understanding how to set up your Kreg Jig correctly, you can ensure strong, hidden joints in your projects. Remember to gather the essential tools that complement your Kreg Jig, as having a well-rounded toolkit can make all the difference in achieving professional results.
As with any crafting endeavor, it’s important to be aware of common mistakes when using a Kreg Jig. Avoiding these pitfalls will not only save you time but also enhance the quality of your work. Once you’re comfortable with the basics, don’t hesitate to explore advanced techniques. Techniques like pocket hole joinery can take your projects to the next level, giving you the confidence to tackle more complex builds.
With your Kreg Jig, you can create a vast array of projects, from simple shelves to intricate furniture pieces. The versatility of a Kreg Jig allows you to bring your creative visions to life effectively and efficiently.
Ultimately, the key to mastering your Kreg Jig lies in practice and experimentation. Embrace the learning process and allow yourself to grow as a woodworker. Whether you’re building for function or aesthetics, the more you engage with your Kreg Jig, the more ideas will spark and flourish. So gather your materials, set up your jig, and let your creativity flow!