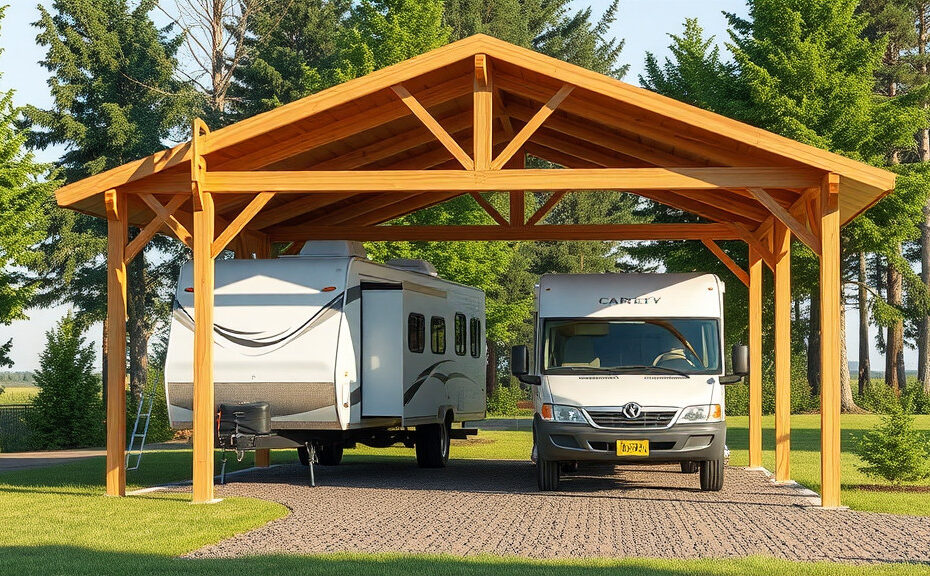
Step-by-Step Guide to Building a Wooden RV Carport
Building a wooden RV carport is a practical solution for protecting your recreational vehicle from the elements. It not only provides shelter but also adds value to your property. With the right tools, materials, and step-by-step guidance, you can create a sturdy wooden carport that meets your needs. This guide will help you navigate the process smoothly.
Materials You’ll Need
- Wood: Pressure-treated lumber is ideal for this project.
- Concrete: For stabilizing the posts.
- Roofing Material: Metal sheets or shingles to protect from rain and snow.
- Screws and Nails: To assemble the structure securely.
- Tools: Circular saw, drill, level, tape measure, and safety gear.
Planning Your Carport
Before starting any construction, take some time to plan your carport. Measure your RV to ensure the carport will be large enough. A standard size for an RV carport typically measures at least 12 feet wide, 25 feet long, and 10 feet high. Adjust these dimensions based on the size of your RV.
Obtaining Permits
Check local zoning regulations to determine if you need a permit for building a carport. Usually, permits are essential to comply with building codes and regulations. This step can save you headaches down the line.
Building the Foundation
The foundation is crucial for the stability of your carport. Start by marking the area for the posts. Use a post-hole digger to create holes about 2 to 3 feet deep, depending on your local frost line. Place the wooden posts into the holes, ensuring they are level. Pour concrete into the holes around the posts to secure them. Allow the concrete to set as per the instructions.
Framing the Carport
Next, you will create the frame. Attach horizontal beams to the tops of the vertical posts using screws. This will create a strong ridge for the roof structure. Consider adding diagonal bracing to give additional support and prevent any swaying. Make sure everything is level and secure as you proceed.
Constructing the Roof
Once the frame is in place, it’s time to add the roof. Start by installing the rafters, which will help support the roofing material. Space the rafters about 2 feet apart, ensuring even distribution. After the rafters are installed, cover them with plywood or OSB boards as a base for the roof material.
Choosing and Installing Roofing Material
You can choose between metal sheets or asphalt shingles for the roof. Metal roofing is more durable and can withstand heavy weather, while shingles may offer a more traditional aesthetic. Begin by laying the roofing material from the bottom up and use nails or screws to secure it in place. Make sure to overlap each row to prevent leaks.
Adding Finishing Touches
After the structure is complete, consider adding finishing touches that can enhance durability and aesthetics. Applying wood sealant can protect against moisture, extend the lifespan of your carport, and improve its appearance. You might also want to add gutters to redirect rain away from the carport.
Maintaining Your Wooden RV Carport
Regular maintenance is key to ensuring the longevity of your wooden RV carport. Inspect it periodically for signs of wear and tear. Clean the roof and gutters, and reapply sealant as necessary. This proactive approach will help maintain its structural integrity and keep your RV safe.
Building your own wooden RV carport can be a rewarding project. With careful planning and execution, you can create a structure that not only serves its purpose but also enhances your outdoor space. Follow these steps, and you’ll be well on your way to providing the perfect shelter for your RV.
Essential Materials Needed for Your RV Carport Project
Building a wooden RV carport is an excellent project that can protect your recreational vehicle from the elements. Whether you’re shielding it from harsh sun rays, rain, or snow, having the right materials will make your project a success. Below, we’ll break down the essential materials you’ll need for your RV carport project and offer some insights on how to choose the best options.
Wood for Your Carport
Your primary material will be wood, and it’s critical to select the right type. Here are some options:
- Pressure-Treated Lumber: This is ideal for ground contact as it resists rot and insect damage.
- Cedar: Known for its natural resistance to decay, cedar is a beautiful choice, though it may be pricier.
- Redwood: Like cedar, this wood is durable and has a natural resistance to insects.
- Plywood: Use this for your roof and siding, ensuring it’s treated for outdoor use.
Hardware and Fasteners
Having the right hardware will ensure your structure is stable and secure. Key items you will need include:
- Galvanized Nails or Screws: These are resistant to rust, making them perfect for outdoor use.
- Brackets and Hangers: Use these to attach beams and trusses for added support.
- Bolts & Nuts: For structural connections where greater strength is required.
Roofing Materials
The roof protects your RV, so choose materials that provide durability and weather resistance:
- Steel Panels: These are sturdy and require minimal maintenance, a great long-term investment.
- Asphalt Shingles: These are an economical choice, offering good protection against rain.
- Metal Roofing Sheets: They are lightweight, durable, and reflect sunlight, keeping your carport cooler.
Foundation Materials
Having a solid foundation is crucial for your carport’s longevity. Consider the following materials:
- Concrete Blocks: These provide stability and keep the wooden structure off the ground.
- Gravel: A layer of gravel can serve to improve drainage and make the base durable.
- Concrete Slab: For a more permanent solution, pouring a concrete slab can offer a robust foundation.
Additional Accessories
While the main materials form the structure of your carport, several additional items can enhance functionality:
- Gutters: To channel rainwater away from your carport, preventing erosion and water pooling.
- Downspouts: Essential for directing water from the gutters safely away from the foundation.
- Lighting Fixtures: If you’ll be using the carport at night, consider installing lights for visibility and safety.
Tools Needed for the Project
Having the right tools is essential to bring your project to life. Here are some you’ll definitely need:
- Power Drill: For creating holes and fastening screws.
- Saw (Circular or Miter): To cut the wood to the required lengths.
- Level: Ensures everything is aligned accurately.
- Measuring Tape: Exact measurements are key in construction.
With the right materials and tools, you can build a sturdy and reliable RV carport out of wood. Remember, proper planning and preparation are vital to achieving a successful outcome. Choose quality materials, and take your time during the build to ensure your carport serves you well for years to come.
Common Mistakes to Avoid When Constructing a Wood Carport
Constructing a wood carport can be an exciting project that enhances the functionality of your property. However, avoiding common mistakes is crucial to ensure that your carport is safe, durable, and aesthetically pleasing. Here are some pitfalls to watch out for, so you can build your wood carport effectively and efficiently.
1. Incorrect Measurements
One of the biggest mistakes you can make is measuring incorrectly. Always start by accurately measuring the space where you plan to build your carport. Use a tape measure to gauge the length and width, and consider the height of your vehicle as well. Double-check your measurements to prevent miscalculations that may lead to structural issues.
2. Ignoring Local Building Codes
Every area has specific building codes and regulations. Failing to check these can result in fines or having to dismantle your carport. Before you begin construction, consult your local building department or website to ensure your plans comply with local laws.
3. Choosing the Wrong Type of Wood
The material you select is critical for the longevity of your carport. Not all woods hold up against elements like rain and sunlight. Opt for treated or naturally durable woods like cedar, redwood, or pressure-treated pine. These materials can withstand the test of time, reducing the need for repairs.
4. Poor Foundation Preparation
A solid foundation is essential for any structure. Skipping or rushing through the foundation preparation can lead to instability. Ensure that you level the ground and lay a foundation that can support the weight of your carport. Options for a strong foundation include concrete footings or a gravel base.
5. Skipping the Design Phase
You might be eager to start building, but skipping the design phase is a common mistake. Take time to sketch out your design or use software to visualize your carport. This step allows you to plan the dimensions and overall look, making adjustments before you start cutting wood.
6. Not Using Quality Hardware
Using poor-quality fasteners and hardware can jeopardize your carport’s stability. Invest in quality screws, bolts, and brackets that are suitable for outdoor use. They will withstand moisture and temperature fluctuations better than cheap alternatives.
7. Forgetting Drainage
Proper drainage is essential to prevent water from pooling around your carport. Without drainage, moisture can seep into the wood and cause rotting over time. Design the eaves or install gutters to redirect rain away from your carport.
8. Rushing the Assembly
In your excitement to finish your wood carport, you might be tempted to rush through assembly. Take your time to ensure each piece is secure and correctly aligned. A well-assembled structure will not only look better but will also last longer.
9. Ignoring Aesthetic Choices
Your carport should blend well with your home’s style and the overall landscape. Skipping aesthetic considerations can lead to a structure that feels out of place. Consider the colors, finish, and design that will complement your home and surroundings.
10. Not Allowing for Flexibility and Change
Construction projects can often lead to unexpected challenges. Being inflexible during this process can lead to frustration. Plan your project but stay open to changes. Whether it’s an adjustment in dimensions or different design elements, adaptability will make your project smoother.
11. Overlooking Ventilation Needs
If your carport will be used for more than just vehicle storage, consider ventilation. Proper airflow prevents moisture buildup that could harm your wood. vents or leaving spaces can improve airflow and protect your structure over time.
12. Not Seeking Help
Don’t hesitate to ask for help. If you feel overwhelmed, consult with a professional carpenter or contractor. They can provide valuable tips and guidance that will enhance your building experience. You’ll learn a lot, and the result will be a sturdy, beautiful carport.
Building a wood carport involves several steps, and avoiding these common mistakes can save you time, money, and a lot of frustration. Take the necessary precautions, do your research, and plan wisely to create a fantastic addition to your property.
Best Design Styles for Your Wooden RV Carport
Building a wooden RV carport can be both a functional and aesthetically pleasing project. When it comes to design styles, the right choice can enhance your property’s appeal and ensure your RV remains safe from the elements. Here are some popular design styles for wooden RV carports, each offering unique features to suit your tastes and needs.
Traditional Style
The traditional design style incorporates classic shapes and elegant details. This style often features:
- Sloped roofs: A common trait that helps facilitate water runoff.
- Decorative trim: Adds a touch of charm to the overall structure.
- Symmetrical designs: Creates a balanced and pleasing aesthetic.
Traditional wooden RV carports can blend seamlessly with older homes and those with classic architectural features.
Modern Style
A modern design for your wooden RV carport emphasizes clean lines, simple forms, and minimal ornamentation. Key characteristics include:
- Flat roofs or slight pitch: This creates a sleek profile.
- Large openings: Allow for natural light and easy access.
- Raw materials: Exposed wood and metal elements enhance the contemporary feel.
Modern styles are perfect for those who appreciate simplicity and functionality without compromising on style.
Rustic Style
If you’re drawn to a more rural, cozy look, consider a rustic wooden RV carport. This design often includes:
- Reclaimed wood: Adds character and an aged appearance.
- Natural finishes: Enhance the wood’s original beauty.
- Stone or metal accents: Provide a rugged feel that complements wooden elements.
The rustic design works well in areas surrounded by nature, creating a harmonious feel with the environment.
Craftsman Style
The Craftsman style is characterized by its handcrafted details and attention to craftsmanship. If you choose this style, look for features such as:
- Wide eaves: Which provide extra shade and protection.
- Exposed beams: These highlight the structure’s craftsmanship.
- Decorative brackets: Add a visually interesting element to the carport.
This design is excellent for those who value artisanal work and want a warm, inviting look.
Contemporary Style
Contemporary wooden RV carports combine elements from various styles, bringing together the best of traditional and modern design. Consider these features:
- Asymmetrical shapes: Create unique silhouettes that stand out.
- Integrative designs: Blend with outdoor spaces like patios and gardens.
- Eco-friendly materials: Focus on sustainable and renewable resources.
This style is adaptable and can reflect your personal taste while maintaining functionality.
Coastal Style
For those living near the water, a coastal design can bring beachy vibes to your RV carport. Important elements include:
- Open-air structures: Allow for breezes to flow through.
- Light colors: Use shades of white, blue, or tan to evoke a seaside feel.
- Marine materials: Consider materials resistant to moisture and corrosion.
The coastal design style enhances a relaxed atmosphere, making it ideal for beachside living.
When selecting a style for your wooden RV carport, think about your existing home, the surrounding landscape, and your personal preferences. A well-designed carport not only protects your RV but also complements your property, adding value and visual appeal. No matter which style you choose, ensure it reflects your unique personality while providing functional space for your recreational vehicle.
Maintenance Tips for Keeping Your Wooden RV Carport in Top Shape
When you invest in a wooden RV carport, you want it to last for many years. Regular maintenance is key to keeping your carport in great condition. Here are some practical tips to ensure your wooden RV carport remains safe, functional, and visually pleasing throughout the seasons.
Regular Inspections
The first step in proper maintenance is conducting regular inspections. Setting aside some time each season to check your carport will help you catch any issues early on. Look for signs of wear and tear, such as:
- Cracks in the wood
- Splintering or rotting sections
- Unstable posts or beams
- Signs of insect infestation
- Damage from weather elements
If you notice any problems during the inspection, address them promptly. Ignoring small issues can lead to bigger, more costly repairs down the line.
Cleaning Your Carport
Keeping your wooden RV carport clean will prevent the build-up of dirt, mold, and mildew, which can lead to deterioration. Here’s how to do it:
- Use a broom: Start by sweeping away leaves, dirt, and debris from the surface.
- Wash with soap: Mix mild soap with water and use a soft brush to scrub the wood gently.
- Rinse thoroughly: After washing, rinse off any soap residue with clean water.
- Allow to dry: Make sure the carport is completely dry to prevent mold growth.
Perform this cleaning at least twice a year, more often if you live in a damp area.
Protecting the Wood
Wood is susceptible to weather damage, so applying a protective coat is essential. You can use a wood sealant or stain to protect your carport from moisture and UV rays. Here are some steps to consider:
- Choose the right product: Look for sealants or stains specifically designed for outdoor use.
- Apply evenly: Use a sprayer or brush to ensure an even application. Be sure to cover all surfaces.
- Reapply as needed: Depending on the product used and environmental conditions, reapply every 2-3 years.
Doing this will help maintain the wood’s integrity and appearance.
Check for Pests
Pests can wreak havoc on wooden structures. Keep an eye out for signs of termites, carpenter ants, or other wood-destroying insects. To safeguard your carport:
- Inspect wood frequently: Look for small holes or sawdust, which are indicators of pest activity.
- Use pest control: If you suspect an infestation, consider using pest control methods or consult a professional to handle it.
- Maintain good drainage: Ensure that water drains away from the carport, as moisture attracts pests.
Maintain Structural Integrity
Regular maintenance goes beyond just the wood itself. Pay attention to the structural components of your carport:
- Check screws, bolts, and nails to ensure they’re tight.
- Inspect the roof for leaks or missing shingles.
- Look out for sagging areas, which may indicate that support beams need reinforcement.
- Ensure that the foundation remains level to prevent shifting.
Addressing any structural concerns early can prevent safety hazards down the road.
Seasonal Preparation
Prepare your carport for changing seasons to minimize damage:
- In spring and summer: Trim back any surrounding trees or shrubs that might scratch the surface of your carport.
- In fall: Rake leaves and remove debris that can trap moisture against the wood.
- In winter: If you live in a snowy area, remove snow buildup after heavy snowfall to prevent stress on the structure.
By taking these proactive steps, you can keep your wooden RV carport in excellent condition. Regular upkeep not only prolongs the life of your carport but also keeps your RV safe and secure.
Maintaining your wooden RV carport involves careful inspections, cleaning, protecting the wood, checking for pests, ensuring structural integrity, and preparing for seasonal changes. By following these tips, you’ll provide the care that your carport needs to shine for years to come.
Conclusion
Building a wooden RV carport can be an exciting and rewarding project that not only protects your investment but also enhances the look of your property. By following the step-by-step guide provided, you have the tools necessary to create a sturdy and functional structure tailored to your specific needs. Remember that gathering the essential materials beforehand will help streamline the construction process, ensuring that you have everything on hand when you start building.
Being aware of the common mistakes to avoid can save you time, money, and frustration during your project. By taking the time to plan thoughtfully, you can sidestep these pitfalls and build a carport you’ll be proud of. Similarly, selecting the best design styles can elevate your home’s aesthetic while providing practical shelter for your RV. With various design options available, you can find a style that complements your home’s architecture.
After completing your carport, regular maintenance is key to keeping it in great condition. Whether it’s checking for rot, applying sealant, or cleaning debris from the roof, staying proactive will extend the life of your wooden carport.
Ultimately, this project is about more than just functionality; it’s about enhancing your living space and ensuring your RV is protected for years to come. Gather your materials, plan thoroughly, and let your creativity shine as you embark on this endeavor. With patience and the right strategies, your dream wooden RV carport will soon become a reality.