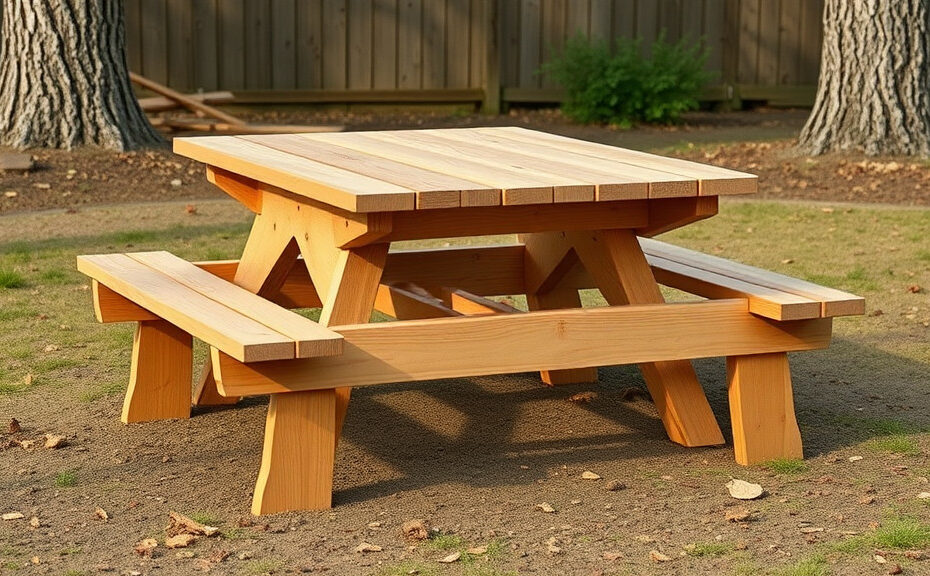

Step-by-Step Guide on How to Build a Picnic Table Out of Wood
Building a picnic table out of wood can be a rewarding project that enhances your outdoor experience. Whether you need a dining space for summer barbecues or a relaxing spot for family gatherings, a well-constructed picnic table serves as a functional piece of furniture. With the right materials and some basic woodworking skills, you can create a sturdy and attractive picnic table.
Gather Your Materials and Tools
Before you start building, make sure you have all the necessary materials and tools on hand:
- Materials:
- 2×4 or 2×6 treated lumber for the tabletop and benches
- 4×4 posts for the table legs
- Wood screws
- Wood glue (optional)
- Outdoor wood finish or sealant
- Tools:
- Measuring tape
- Power drill
- Table saw or circular saw
- Sander or sanding block
- Clamps
- Safety goggles and gloves
Step 1: Plan Your Design
Before cutting any wood, sketch a design for your picnic table. Common dimensions for a picnic table include:
- Tabletop: 28-30 inches high and 60-72 inches long
- Benches: 18-20 inches high and the same length as the tabletop
Your design will determine how much wood you’ll need, so plan accordingly. Ensure that the table is sturdy and proportionate, allowing for comfortable seating.
Step 2: Cut the Lumber
Once you have your design, start cutting the lumber to size. Measure twice and cut once to avoid mistakes. Here’s a basic list of what you will need to cut:
- Tabletop slats (4-6 pieces, depending on width)
- Bench slats (2-4 pieces, each bench)
- Legs (4 pieces, 28-30 inches long)
- Support beams (2 pieces, length according to your design)
Step 3: Assemble the Tabletop
Start with the tabletop. Lay out the slats side by side with even spacing. Use clamps to hold them in place, then secure them together using wood screws. Position the screws in a staggered manner for better stability. If desired, apply wood glue before securing the screws for added strength.
Step 4: Attach the Legs
Next, attach the legs. Here’s how:
- Take the 4×4 posts and attach them to the corners of the tabletop using wood screws. Ensure they are square and level.
- Create a support beam by cutting two pieces of lumber that will connect the legs. This will add stability.
- Place the support beam about halfway up the legs and secure it with screws.
Step 5: Build the Benches
Now it’s time to construct the benches. Here’s a simple way to do it:
- Attach two legs to each side of the bench.
- Securely fasten the slats together for the bench’s surface.
- Attach the benches to the sides of the picnic table, ensuring they are level with the tabletop.
Step 6: Sand and Finish
After the structure is complete, use a sander to smooth out any rough edges. This ensures safety while using the picnic table. Following that, apply a weather-resistant finish or sealant to protect the wood from the elements. This step enhances durability and maintains the beauty of your handiwork.
Step 7: Final Inspection
Once everything is dry, do a final check. Test the stability by sitting on the benches and gently rocking the table. Make any necessary adjustments by tightening screws or adding reinforcement where needed. Your picnic table is now ready for outdoor enjoyment!
Now that you know how to build a picnic table out of wood, gather your materials and enjoy this satisfying project! With this sturdy table, you’ll create beautiful moments outdoors for years to come.
Essential Tools and Materials for Your Picnic Table Project
Building a picnic table can be a rewarding project, and having the right tools and materials is crucial for your success. In this guide, we’ll explore everything you need to know to gather your supplies effectively. Whether you’re a seasoned woodworker or a novice, understanding the essentials will help you create a sturdy and beautiful picnic table that you can enjoy for years.
Essential Tools
When you’re ready to dive into your picnic table project, make sure you have these essential tools on hand:
- Measuring Tape: Accurate measurements are critical in woodworking. A reliable measuring tape ensures your cuts and joins are precise.
- Cool Saw: A miter saw or circular saw offers versatility for cutting various materials. Depending on your budget, cordless options can make moving around easier.
- Drill/Driver: An electric drill speeds up the process of making holes for screws. It’s also useful for driving screws into wood, reducing the risk of splitting.
- Screwdriver: While an electric drill can do most of the work, a manual screwdriver is handy for tightening screws in tight spots.
- Level: A level is essential to ensure your picnic table sits evenly on the ground. An unlevel table can be wobbly and uncomfortable.
- Square: A carpenter’s square helps you create perfect right angles, ensuring that your table is square and well-aligned.
- Sandpaper/Sander: Smooth edges and surfaces are key for safety and aesthetics. Have both fine and coarse grits on hand for different stages of sanding.
- Clamps: Clamps hold pieces together while glue dries or when you’re screwing them. They are invaluable for obtaining a tight fit.
- Safety Gear: Always prioritize safety. Use goggles, gloves, and a dust mask to protect yourself from debris while working.
Necessary Materials
Now that you’re equipped with the right tools, let’s look at the materials needed for your picnic table.
- Wood: Choose durable, weather-resistant wood like cedar, redwood, or treated pine. These choices offer both longevity and natural beauty. For a standard picnic table, consider using 2x4s for the tabletop and 4x4s for the legs.
- Screws: Opt for galvanized or stainless steel screws. These materials resist rusting, making them ideal for outdoor furniture.
- Wood Glue: High-quality wood glue can strengthen joints. It’s particularly useful in combination with screws for extra durability.
- Finishing Stain or Paint: A weatherproof stain or exterior paint protects your wood from rain and sun. This step also adds a personal touch to your picnic table.
- Sealer: Applying a sealer can provide an additional layer of protection against moisture and sunlight, prolonging the life of your picnic table.
Step-by-Step Preparation
Before diving into the assembly of the picnic table, it’s important to prepare. Follow these steps to ensure a smooth building process:
1. Plan Your Design: Sketch your desired picnic table layout to determine dimensions and features such as benches or an umbrella hole.
2. Measure and Cut: Use your measuring tape and saw to cut the wood according to your plan. Remember, measure twice, cut once!
3. Pre-Drill Holes: Before screwing, pre-drill holes to prevent the wood from splitting.
4. Smooth Edges: Use sandpaper or a sander to create smooth edges, preventing splinters and enhancing the table’s appearance.
5. Assemble the Frame: Start by constructing the frame of the table and benches, using clamps to hold pieces together until securely fastened.
By gathering these tools and materials, you’re setting yourself up for a successful picnic table building experience. The right preparation and resources can turn your vision into a reality, providing a lovely space for enjoying meals outdoors with family and friends. Remember, take your time, enjoy the project, and don’t hesitate to reach out to fellow woodworkers for tips or ideas. Happy building!
Choosing the Right Wood for Durability and Aesthetics
When it comes to building a picnic table, the choice of wood is crucial for both durability and aesthetics. Selecting the right type can enhance the longevity of your table and make it a beautiful centerpiece in your outdoor space. Here’s a detailed guide to help you choose the best wood for your picnic table project.
Types of Wood
There are several types of wood available, each with its unique properties. Understanding these will help you make an informed decision:
- Softwoods: Softwoods like pine, fir, and cedar are popular for picnic tables. They are generally easier to work with and more affordable. However, they may require additional treatment to withstand the elements.
- Hardwoods: Hardwoods such as oak, teak, and mahogany are denser and more durable. These woods offer excellent resistance to wear and tear, but they can be pricier and more challenging to work with.
- Pressure-Treated Lumber: This type of wood has been treated with chemicals to resist moisture, decay, and insects. It’s great for outdoor use due to its longevity, but it may not have the same aesthetic appeal as untreated woods.
Factors to Consider
Choosing the right wood involves considering several factors that affect both durability and style. Here are some key aspects to keep in mind:
- Weather Resistance: If you live in an area with harsh weather conditions, you need wood that can withstand rain, snow, and sun exposure. Look for rot-resistant options like cedar or pressure-treated lumber.
- Aesthetic Appeal: Wood species vary in grain patterns and colors. Think about how the wood will match your outdoor decor. For a rustic look, consider knotty pine, while sleek designs may benefit from straight-grained hardwoods.
- Maintenance Requirements: Some woods require more maintenance than others. If you’re looking for low-maintenance options, consider using pressure-treated lumber or naturally rot-resistant woods such as cedar.
Cost Considerations
Budget plays a significant role in your wood selection. Here’s a breakdown of average costs associated with different types of wood:
- Pine: Generally the most affordable option, costing roughly $2 to $5 per board foot.
- Cedar: A mid-range option, typically ranging from $5 to $10 per board foot, known for its beauty and durability.
- Oak: A premium choice, priced around $6 to $12 per board foot, recognized for its strength and beautiful grain.
- Teak: Considered a luxury wood, often costing $10 to $30 per board foot, renowned for its natural oils that resist moisture.
Finishing Touches
Once you’ve chosen your wood, it’s important to consider finishing options. Applying a protective sealant can greatly enhance the durability of your picnic table. Here’s how:
- Stain: A good stain enhances the wood’s natural beauty while providing a layer of protection against UV rays.
- Sealants: Use waterproof sealants to protect against moisture and prevent warping.
- Regular Maintenance: Ensure to clean the wood regularly and reapply treatments as needed to keep it in top condition.
Final Thoughts
Choosing the right wood for your picnic table is a balance between aesthetics, durability, and budget. By carefully considering the type of wood, its weather resistance, maintenance needs, and overall costs, you can create a beautiful and lasting addition to your outdoor living space. Keep in mind the importance of finishes in enhancing wood’s longevity. With the right choices, your picnic table can become a cherished gathering spot for years to come.
Designing Your Picnic Table: Styles and Layouts to Consider
When it comes to creating the perfect picnic table, the design and layout you choose can significantly impact both functionality and aesthetics. Selecting the right style isn’t just about looks; it also ensures that your picnic table fits your space and personal preferences. Let’s dive into the various styles and layouts to consider.
Traditional Picnic Table
The classic picnic table design features a rectangular top and connected benches on either side. This straightforward layout is ideal for family gatherings or casual outdoor meals. Here are some key features:
- Sturdy Construction: Usually made from heavy wood or composite materials to withstand outdoor conditions.
- Space Efficiency: The connected benches save space and can accommodate multiple people.
- Versatility: Great for barbecues, picnics, and even games.
Round Picnic Table
If you’re looking for a more relaxed atmosphere, a round picnic table is an excellent choice. Its circular design allows for easy conversation and interaction among guests. Consider these aspects:
- Seating Arrangement: Usually accommodates people comfortably, encouraging a social vibe.
- Aesthetics: Helps soften the harsh lines of a yard, blending well with gardens and natural surroundings.
- Space Consideration: Requires more space around it compared to traditional designs due to the need for additional elbow room.
Rectangular Picnic Table with Attached Umbrella Hole
Including an umbrella hole in the center of your picnic table can provide much-needed shade during sunny days. This type often combines functionality with style:
- Comfortable Dining: Enjoy meals outdoors without worrying about sun exposure.
- Customizable: You can paint or stain it to match your home decor.
- Family-Friendly: Perfect for families who want to dine outdoors comfortably.
Benches with Backrests
For added comfort, designing a picnic table with backrests on the benches can greatly enhance the dining experience. This style is perfect for longer gatherings:
- Enhanced Comfort: Provides support for guests, making it more enjoyable to sit for extended periods.
- Ideal for Entertaining: Perfect for hosting picnics or outdoor parties.
Modern Picnic Table Designs
For those who prefer a contemporary aesthetic, modern picnic tables often integrate sleek lines and minimalist designs. Here are some elements to consider:
- Materials: Often crafted from alternative materials like metal or recycled plastics for a modern touch.
- Sleek Shapes: Can feature various shapes like trapezoidal or asymmetrical forms.
- Low Maintenance: Many modern materials are easier to maintain and resistant to weathering.
Modular Picnic Tables
If you frequently host large gatherings, think about investing in a modular picnic table. This design allows you to customize your table for different occasions:
- Expandable: Can be expanded or reduced in size depending on your guest list.
- Versatility: Easily reconfigured for dining or games.
- Creative Designs: Can be designed to fit specific themes or styles.
Picnic Table with Built-in Coolers
For convenient access to drinks and snacks, consider a picnic table that includes built-in coolers. This design offers practicality for outdoor activities:
- Convenience: Keeps beverages chilled and snacks easily accessible.
- Space Saving: Eliminates the need for extra tables or coolers scattered around.
Designing your picnic table involves thoughtful consideration of both style and functionality. Whether you go for a classic look or a modern twist, the right design can enhance your outdoor living space and elevate the enjoyment of your meals. A well-designed picnic table not only complements your yard but also provides a gathering spot that families and friends will cherish for years to come. As you embark on your project, remember to factor in materials, environment, and personal taste to create a picnic table that fits your lifestyle perfectly.
Maintenance Tips for Long-Lasting Picnic Tables
Picnic tables serve as great gathering spots for family and friends, fostering memories over shared meals and laughter. To ensure that your picnic table stands the test of time and continues to be a beloved part of your outdoor adventures, regular maintenance is key. Here are some essential tips to keep your wooden picnic table in top shape and looking its best.
Clean Your Picnic Table Regularly
One of the simplest yet essential maintenance tasks is regularly cleaning your picnic table. Dirt, food particles, and stains can accumulate over time, leading to bacteria growth and wood damage. Here’s how to keep it clean:
- Use Mild Soap: Mix a few drops of mild dish soap with warm water. Use a soft cloth or sponge to gently scrub down the surface.
- Rinse Thoroughly: After cleaning, take a hose and rinse off any soap residue. This prevents any potential buildup that could harm the wood.
- Dry Completely: Wipe down the surface with a towel or let it air dry to avoid moisture retention, which can lead to rot.
Inspect for Damage
Inspecting your picnic table regularly allows you to catch minor issues before they become significant problems. Check for:
- Cracks and Splits: Look for any visible cracks in the wood. If found, fill them promptly with wood filler.
- Loose Screws or Bolts: Tighten any loose components to maintain stability.
- Signs of Rot: If the wood feels soft or spongy in places, it may be starting to rot. Replace affected sections as necessary.
Protect from Weather Extremes
Exposure to harsh weather can greatly affect the longevity of your picnic table. Take the following precautions:
- Use a Waterproof Sealant: Apply a high-quality sealant to protect against moisture. This is particularly important after cleaning or repairs.
- Cover When Not in Use: Consider investing in a waterproof cover. This simple step can prevent water damage and fading from sunlight.
- Store Indoors During Harsh Seasons: If possible, store your picnic table indoors during winter months to protect it from snow and ice. If that’s not an option, elevate the table off the ground and cover it.
Stain and Finish Regularly
Reapplying stain and finish at least once a year can drastically prolong the lifespan of your picnic table. Here’s how to properly stain and finish:
- Choose the Right Stain: Pick a stain that’s specifically designed for outdoor furniture. Look for a UV protectant to guard against sun damage.
- Prepare the Surface: Sand the surface lightly to ensure the stain adheres properly. Clean off any dust before applying.
- Apply Evenly: Using a brush or cloth, apply the stain in long, even strokes. Allow it to soak in and dry as per the product’s instructions.
Addressing Insect Infestation
Wooden structures can attract insects, such as termites and wood borers. To protect your picnic table:
- Choose Treated Lumber: If you’re building a new table, use pressure-treated wood that resists insect infestation.
- Inspect for Insects: Regularly check the undersides and hidden areas for signs of insects. Catching an infestation early can save you from major repairs.
- Apply Pesticide Safely: If necessary, use a safe pesticide designed for outdoor furniture to safeguard against pests.
Be Mindful of Usage
How you use your picnic table also affects its longevity. Consider these tips:
- Avoid Excessive Weight: Don’t place heavy objects on the table. Too much weight can warp or break the wood.
- Caution with Hot Items: Always use coasters or trivets to avoid burns or marks on the wooden surface.
- Watch for Liquid Spills: Clean any spills immediately to prevent staining and wood damage.
By following these maintenance tips, you can enjoy your picnic table for years to come. A little regular attention can go a long way in keeping your outdoor furniture beautiful and functional, making it an inviting spot for family gatherings and fun outdoor activities.
Conclusion
Building a picnic table out of wood can be a rewarding project that enhances your outdoor space. By following the step-by-step guide, you have the foundation to create a beautiful and functional piece of furniture that you and your family will enjoy for years to come. Remember, choosing the right tools and materials is crucial; they not only affect the ease of construction but also the longevity of your picnic table.
Selecting the appropriate wood is vital for ensuring durability and visual appeal. Whether you opt for classic cedar or sturdy pressure-treated lumber, make sure your choice aligns with your aesthetic goals and climate considerations. Additionally, designing your picnic table allows you to personalize it according to your space. From simple rectangular shapes to more intricate designs, there’s a style for everyone.
Once your picnic table is complete, ongoing maintenance will help keep it looking its best. Regular cleaning, sealing, and inspections will prolong its life and keep it safe for gatherings. With the right care, your picnic table will not only be a centerpiece for outdoor meals but also a testament to your craftsmanship.
This project can foster creativity, teamwork, and a deeper appreciation for your outdoor setting. Gather your materials, invite friends or family to help, and embrace the joy of building something that brings people together. Enjoy the fruits of your labor as you sit around your new wooden picnic table, making memories that last a lifetime.
